WordPress to Static HTML Using Simply Static on PatrickCoombe.com (an ongoing case study)

Using your personal website as a proving ground for new projects is one of the best reasons to have a personal website. For a long try I wanted to try the whole WordPress to static HTML route, so one Saturday afternoon I gave it a shot.
I started out by installing Simply Static WP plugin. It is fairly easy to configure (I am using the free version).
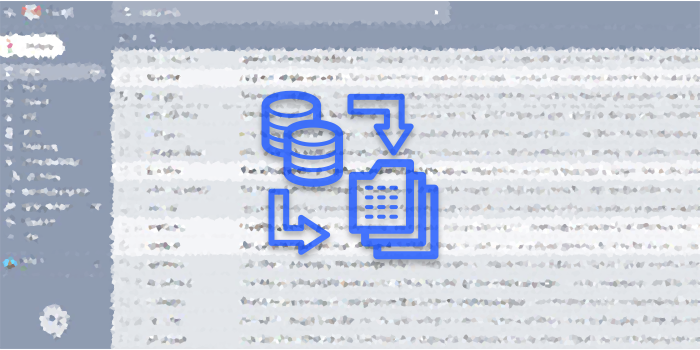
Basically what it does is scrape your website and convert it to static HTML files. By default it will spit out a zip file and you will download it to your PC or Mac. When you browse the zip you will see each post and page gets its own folder, and inside each folder is an index.html file. Very cool. You can open up the index.html file and peruse the files on your home PC.
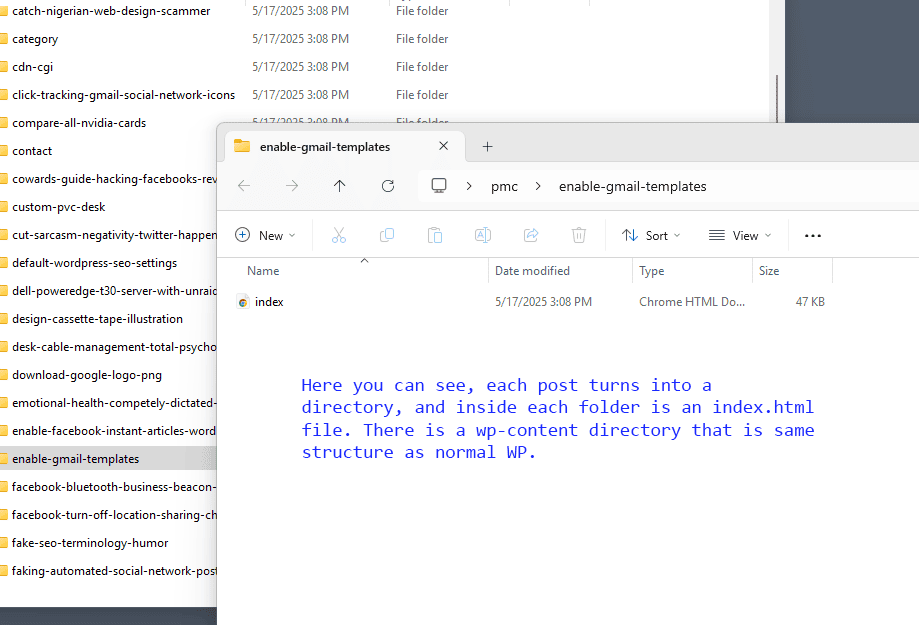
Browsing my static website on my Windows 11 PC in explorer. Once I had the files locally and was able to test them, I now had to deal with the fact that my static website and WordPress website cannot share the same domain. Later I will show you my solution, which is one of many where I moved my WP site to a subdomain.
Back it Up!
Before you even begin thinking about doing this, back things up. For me, I backed up my whole WordPress installation, the whole home dir, the database etc. I also made a total snapshot of my server and saved everything somewhere else.
There were at least 2-3 times where I majorly screwed up settings and had to revert, so back your site up first!
About The WordPress / Static HTML “Stack”
Next, I went shopping for hosting. I could have kept it on my $6/month Vultr server but that would be BORING. I decided on Cloudflare Workers / Pages. It is fast and it is free. (runner up options were AWS S3 and GitHub Pages. )
So I started by logging into my Cloudflare account. Note: it really helps if your DNS is also hosted with Cloudflare but it is not mandatory.
So that is how this works. There are many different ways to do this including hosting it on a regular Apache/Nginx server, hosting it on S3, or even on Github Pages. If you are a fan of over-engineering things there are so many more things you can do to make your site faster and more efficient.
Setting Up Cloudflare Pages
If you are going to use my method, you need a Cloudflare account. If you have one head over there, if not create a free account.
Login to Cloudflare and do this:
Select your domain > Compute (workers) > workers & pages > go to Pages
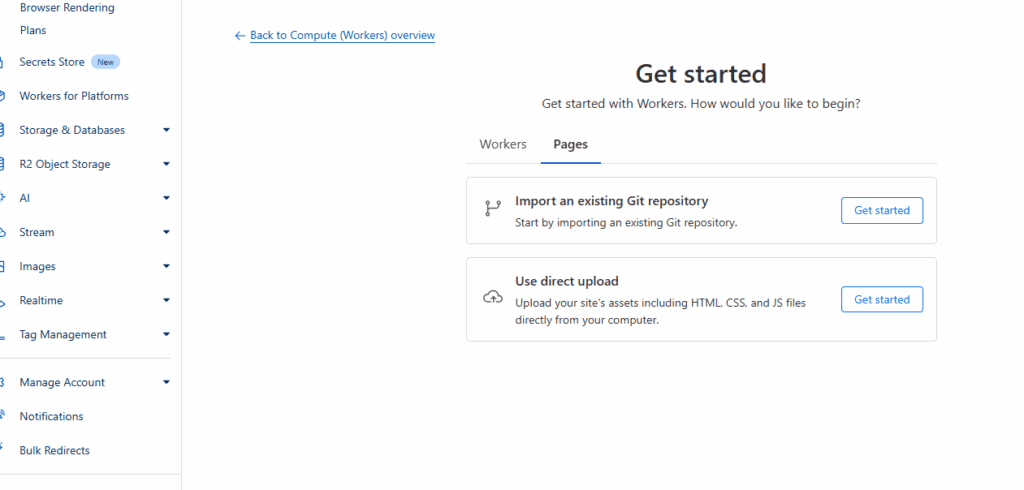
From here if you have a small and simple site, you can upload your files directly, or if you are a difficult person like me that likes to over-engineer even the simplest of things, choose “import a git repo.” Keeping all your files in Github is a great way for another level of backup, and to save versions of your site for archival and debugging purposes later.
Follow the prompts on Cloudflare, use your best judgement. This part was pretty easy.
Simply Static Plugin: Deploying and Tweaking
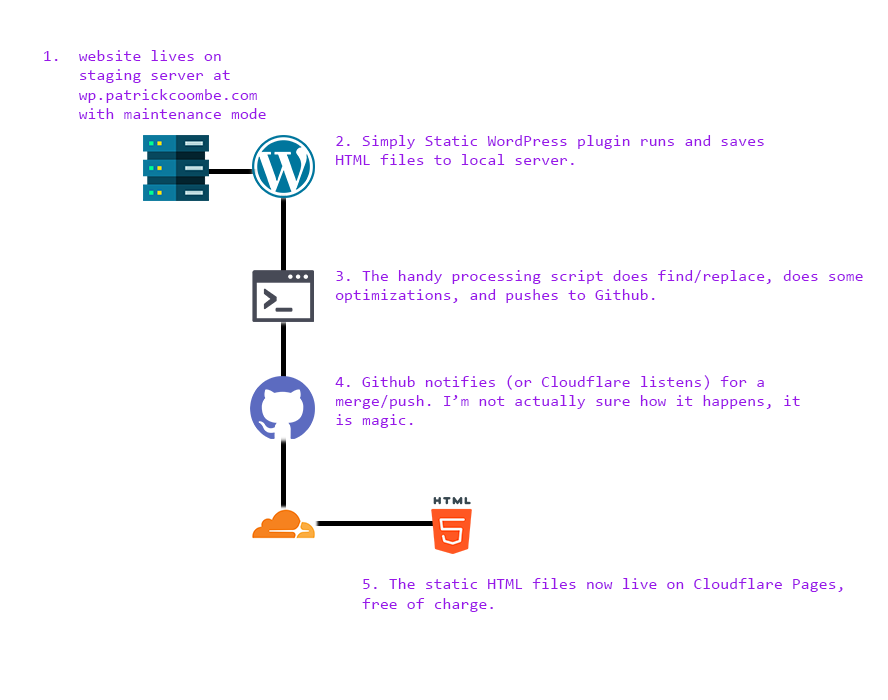
Ok at this point, I was happy with my site so I was ready for deployment. I had to make sure that it was deploying to my Linux server, so that the static HTML files can be prepped, processed and parsed for delivery to Cloudflare Pages, the final resting ground. You also want to make sure you have the correct deployment settings.
Make sure to change these settings first. Switch to local directory and select a directory on your server (particularly one that your site has access to on your server like /var/www/something)
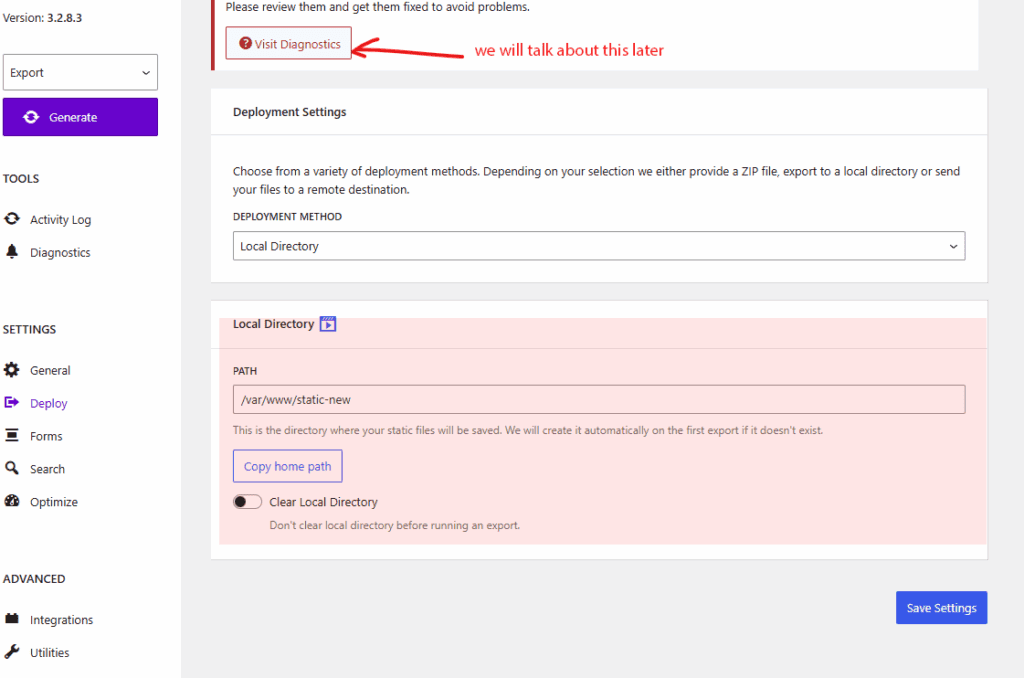
I ticked the “clear local directory” tick to have a clean slate each time.
Be sure you do not accidentally choose your ACTIVE / WORKING directory or it will wipe your entire WP site!
Ok now deploy Simply Static, click the shiny button. Watch the logs! Your site should now be downloaded to your server.
Remember the path where it is downloaded. Again, there are many different ways to do this, even more if you have the PRO version of Simply Static.
Absolute Vs Relative URLs
In simple terms and in this scenario the difference between absolute URLs and relative URLs is this:
absolute URL: https://example.com/horses/ponies.jpg
relative URL: /horses/ponies.jpg
Both “work” but in my opinion and in my experience in this scenario absolute URLs are better, they are more foolproof.
Using relative URL’s broke my Facebook OGP and Twitter card functionality
I really did not look too deeply into this but when I went to validate this blog post on Twitter and Facebook and it FAILED. I looked at the log and it gave me some sort of 404 URL “wp-content-blah-blah-blah” so I switched to absolute URLs and now they are good.
Git & GitHub things
This is the hard part. Now the goal is to push it to GitHub via git, and have GitHub sync with Cloudflare pages.
I am going to bullet point this section instead of writing out long instructions.
- create a new private repo in github.com
- I am assuming git is installed, you have a GitHub account, and you’ve configured git / github key
- from your Simply Static directory on Linux (/var/www/whatever) run “git add .”
- then do a “git status”
- then a git commit -m “my simply static website”
- then something along the liens of git remote add origin [email protected]:patrickcoombe/patrickcoombe-static.git
- and finally git push -u origin master
So above, you basically use git to send your Simply Static HTML files from your server to a private github repo that is synced with Cloudflare.
At the end of this post is a shell script to automate and deploy of this so don’t worry!
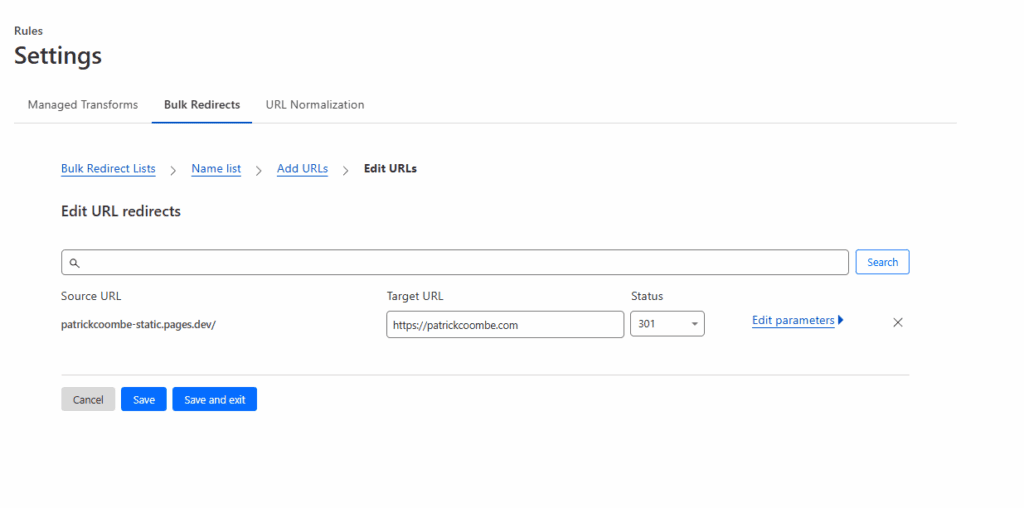
Cloudflare Redirects
At this point you should be able to see your website at something like this – https://patrickcoombe-static.pages.dev/ – but that ain’t good.
Having that visible to the world is not ideal from an SEO or privacy perspective. The whole goal here is for you to be able to casually make changes to your bloated WordPress website, and when you are ready to deploy it as a static HTML site.
So in Cloudflare I went to Rules > Settings > create bulk redirect rule.
From there I redirect the *pages.dev to my main domain patrickcoombe.com where you are right now.
You following me?
Test Your Static Site
Go to your domain and test! Here is a quick checklist:
- is wp-admin loading? No? good!
- are images loading?
- are all pages loading?
- is everything working properly?
- is anything broken?
I am lucky I do not have forms or anything complex on my site. Simply Static does have an option to do this but I have not tested it.
Test everything and try to explore.
Moving and Hiding Your WordPress Website
Your WordPress site should really not live on the same domain as your static HTML site.
So I began the arduous process of moving patrickcoombe.com to >> wp.patrickcoombe.com
You can do this however you want. You need a live version so that you can make changes to your site, you can “push” it to the static version.
For me I did things the hard way and manually moved it on my own server.
I went through the whole process of moving the site to the subdomain including moving all files from /var/www/html to /var/www/wp.
I am personally using a one-click Litespeed server and I am not great with Litespeed, so editing the vhosts file was a a new experience and tricky for me.
Either way: the goal here is to move your WordPress website from your main domain, to a subdomain, sub-directory or even a totally separate domain.
Ok from here I went int Cloudflare DNS and added an A record with my Vultr IP address :: wp.patrickcoombe.com. Proxy status is off.
Now wp.patrickcoombe.com is my “staging / dev” site.
Ok now is my conundrum: I wanted to hide my WordPress website from Google and the world via .htaccess, maintenance mode in the theme, or “discourage Google from…” setting in settings > reading. In the illustration above where the Simply Static dashboard showed a red diagnostic error, this was because maintenance mode was enabled and Simply Static cannot crawl / rip your site if maintenance mode, coming soon mode, or discourage Google (noindex) is enabled.
So for now, my work flow involves turning maintenance mode on/off each time I redeploy a new version of my site. No biggie.
A cool way to test a site is to spin up a simple Python server, then tunnel in on your local machine.
I did it like this:
cd /var/www/static-new
Then ran:
python3 -m http.server 8000
then on my local machine
ssh -L 8000:localhost:8000 [email protected]
Then, on your local machine, open a browser and visit http://localhost:8000 to preview the site.
Automating All of This
Now that you’ve tested this, deployed your WordPress site to static HTML and have a good handle on things it is time to automate this.
The below script that I developed will accomplish several things
- check to see if a new static site is available (from where you defined it in Simply Static plugin)
- replace all the URLs from your subdomain or IP to your live site
- back everything up
- remove old files in your git repo so you can send new files there
- copy your static HTML files to your repo
- stage, push, do git things
- that is it!
I would actually like to add a before and after backup with %date% %time% variables in the filename at some point but maybe later.
Now this is automated your flow will look something like this
- make changes on your WordPress site
- deploy Simply Static (wait)
- run your shell script
- boom done!
Could not get easier and cheaper than that!
This is the bash script that I use that I run on my machine any time I have a new version of my site I want to deploy:
The Bash Script
So now anytime I make a change on my WordPress site I run this script
My Wish / To Do List
This is my personal wish / to-do list. Some of these things I just need to do, others I need to figure out how to do or if it is possible.
- Test forms to see how that works
- Do SEO on this site lol
- fix robots.txt (done)
- proper optimization of unused CSS, combining files, etc
- exclude category / tag / author pages
- Issue – if I have folders in my home directory like Google Search Console *html file or other proof/validation files, do those move automatically? Test this
- Incremental options – sending so many files each time is crazy. The pro version of the plugin does this but I am sure I can add this functionality to the deployment script.
- Google Analytics – ooops forgot to add this.
If you enjoyed this post you don’t have to do anything, if you want you can like, subscribe, share, or link to me. I get general satisfaction from helping people and the emails I’ve received over the years from people I’ve helped have been so cool!
I also recently made an accompanying video for this process, it is a much shorter explanation but hopefully it will be helpful to some!