Dell PowerEdge t30 Server with UNRAID NAS

2025 Update: If you are looking for the T30 v 1.0.0 BIOS I have it. I don’t want to host an EXE on my server so if you want it contact me patrickfl @ google’s email I’ll email it to you.
Over the years I’ve accumulated a lot of data. Not including “work” backups, each month I archive around 20 GB of personal data, at the very least. With my new drone hobby that number is probably 10x that amount. Up until now I’ve used a basic RAID file server in my home, which resides on an HTPC. This 2TB server has done a fine job but is almost at capacity and frankly does not have the redundancy I am looking for.
I do not trust the cloud for my personal data. Before you go thinking I have wild conspiracy theories, forget all of the privacy concerns and security issues. Let’s say something happens and I forget to pay my bill or I get wiped out in a world wide pandemic. All of my data would probably vanish without Google or Amazon even blinking.
My data is invaluable and priceless to me. Photos of my children’s birth, my wedding, and all of my families memories, are irreplaceable and it would be horrible if I lost it. In addition to those photos, personal projects, financial backups, website backups, graphic backups and so much more. Thankfully I’ve tried my best to employ the 3-2-1 principle of data backup:
- 1 – keep at least 3 copies of your data
- 2 – keep your data on 2 different storage types
- 3 – keep at least 1 copy of the data off-site
My data is on a file server and external hard drives. About once per year I take an external hard drive to a bank safe deposit box.
Enter: Dell t30
When I saw the Dell t30 go on sale at Dell Outlet for around $300, it piqued my interest. The specs:
- Processor: Intel Xeon E3-1225 v5 Processor (Quad Core, 3.30GHz, 8M Cache, 80W)
- No Operating System
- 1TB 3.5inch SATA Hard Drive (7200 RPM)
- 8GB (1x8GB) 2666MHz DDR4 UDIMM ECC
- 8X DVD +/- RW Drive
- Chassis with up to 4, 3.5 in Hard Drives
- Dell Outlet PowerEdge T30 Server
- 290W PSU
My upgrades:
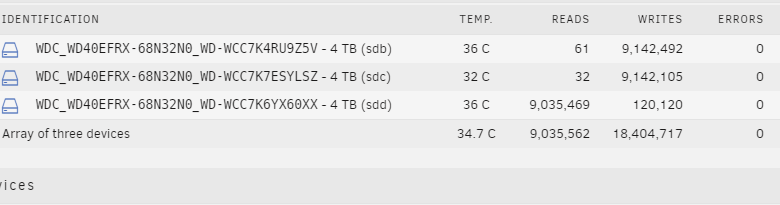
- (3x) WD Red 4TB NAS Hard Disk Drive – WD40EFRX (for NAS)
- HP EX920 M.2 256GB PCIe 3.0 x4 NVMe – 2YY45AA#ABC (for cache)
- SanDisk 16GB Cruzer Fit USB Flash Drive – Low Profile (for UNRAID Boot)
The Dell t30 is a very small server. Smaller than both of the mATX chassis’s I had laying around by a solid amount. The chassis is beautiful. A very well constructed case with everything needed for a home server. Tons of USB ports, USB 3 on the front and back. No VGA or DVI ports, only display port (2) and HDMI. Also has PS2, ethernet, serial and audio. It runs very quiet, the quietest computer in my household.
Just for fun, I installed Windows 10 to see how it performed. It installed Windows 10 without a hitch and didn’t require any drivers. I found it was very responsive and was able to run a lot of concurrent web browser tabs (including Netflix and Youtube) without issue.
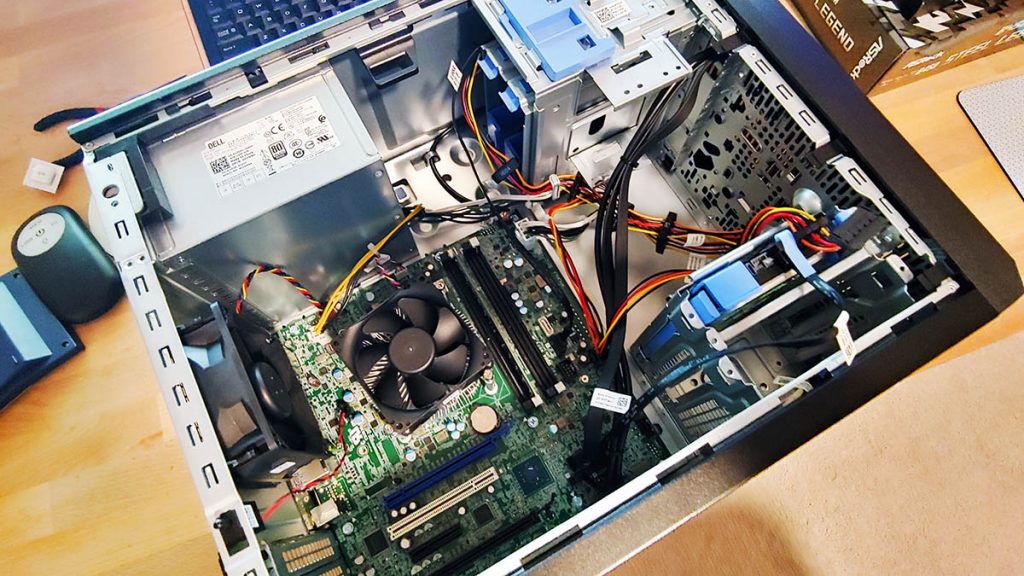
Here is a nice shot of the internals, as it came direct from the factory:
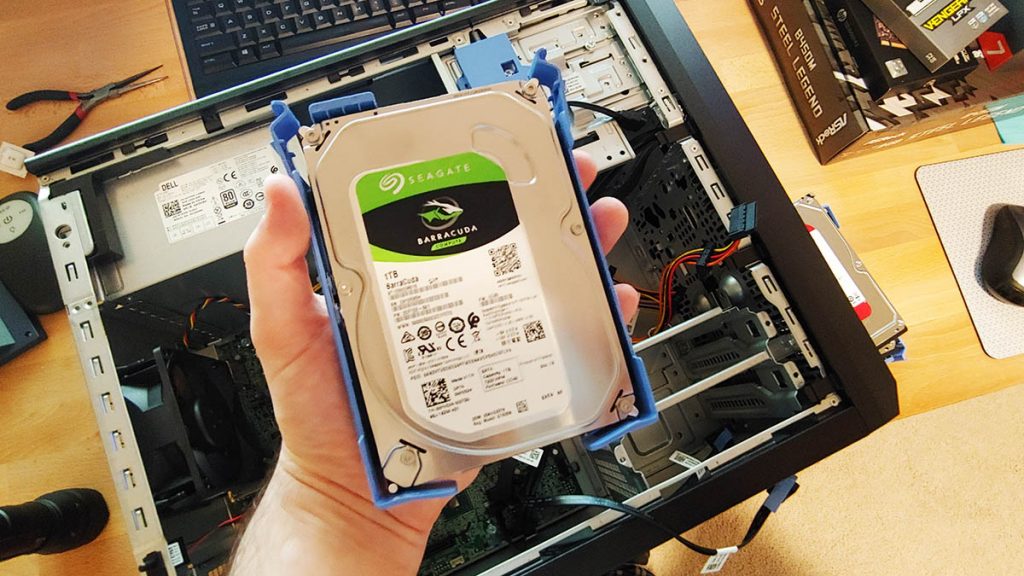
 After passing all of my tests, it is upgrade time. I started by ripping out the stock HDD and examining the chassis and drive cages. It came with a 1TB Seagate Barracuda which wouldn’t do much for me.
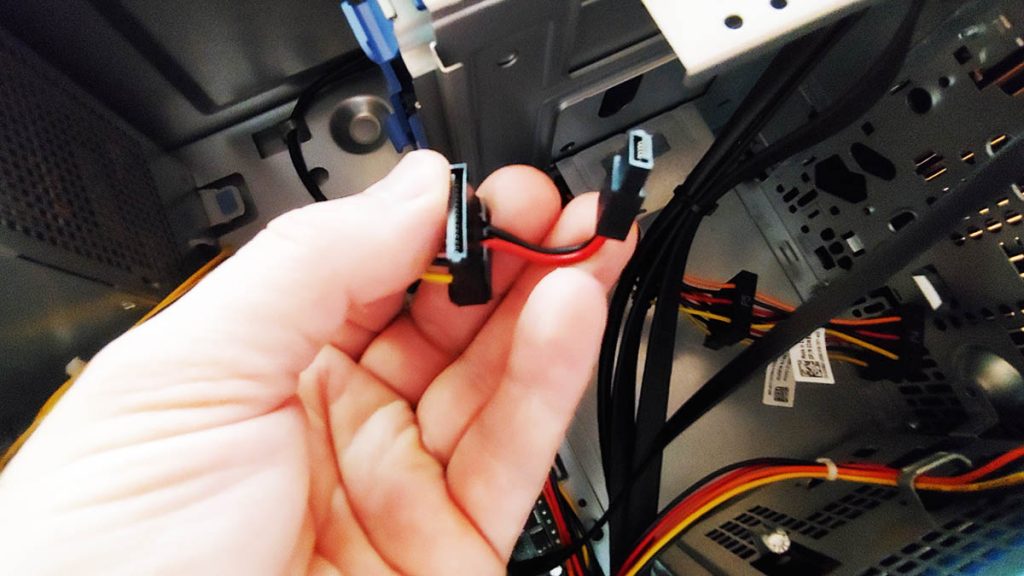
I disconnected the DVD drive, I wouldn’t be needing that anyway and didn’t want to get in the way of the SATA controller. The SATA cables were bundled nicely and came with some interesting tabs on the end.
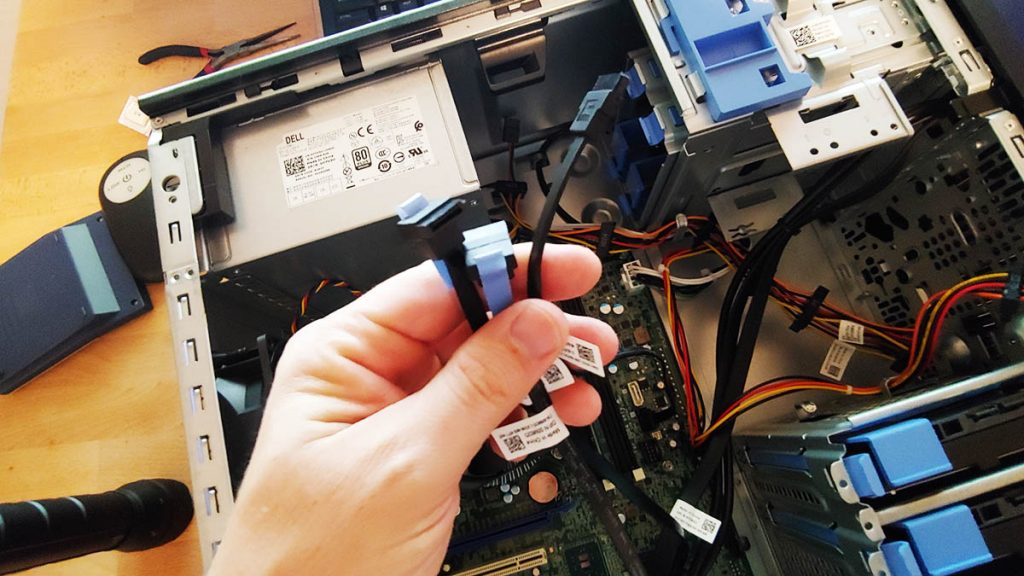
The DVD had an interesting cable I’ve never seen before: a combo SATA / mini-SATA cable. I put that aside as I wouldn’t be needing it.
Adding Hard Disks
3x 4TB hard drives will give me an 8TB share, with 4TB of parity for near perfect redundancy. Adding the hard drives was easy, I started by taking out the (top)hard drive cage and inspecting it.
There are (4) 3.5″ bays by default, with some hacking you could probably add more cages for 6, or possibly 8. Today I am populating 3 out of 4. I may add a 4th drive but I don’t see myself filling 8TB for the next 12-24 months.
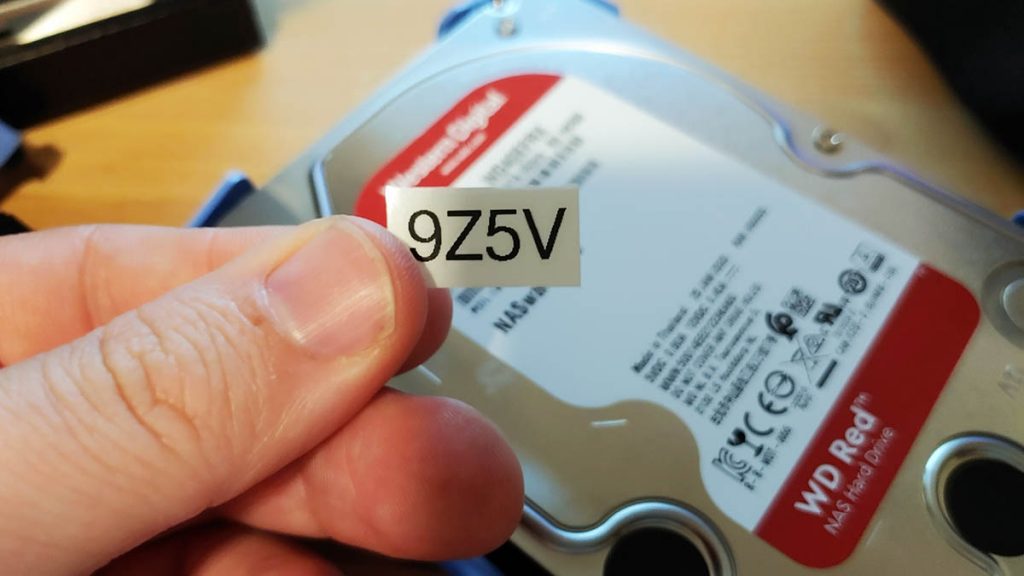
I labeled the back of all of my drives with the last 4 of their serial numbers. This might sound a bit neurotic, but I’ve worked in servers where drives failed and they did not match up with the corresponding bay and it is a huge pain in the ass. Not something you want to trial-and-error your way out of.
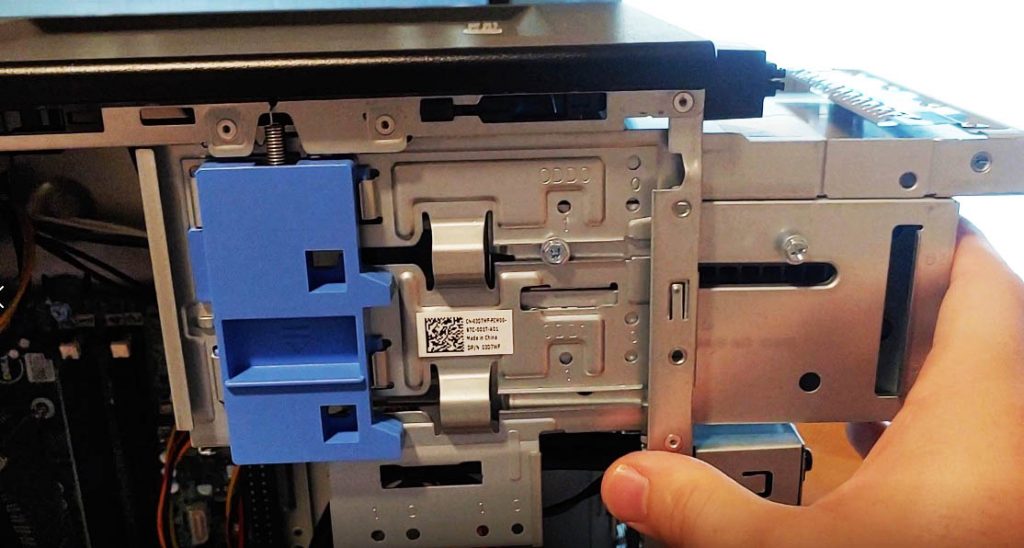
 Dell engineered their cables to be the exact length you need, with the exact amount of spacing in between drives plus a little wiggle room. All of the cages were “tool-less” and popped in in just a few minutes.
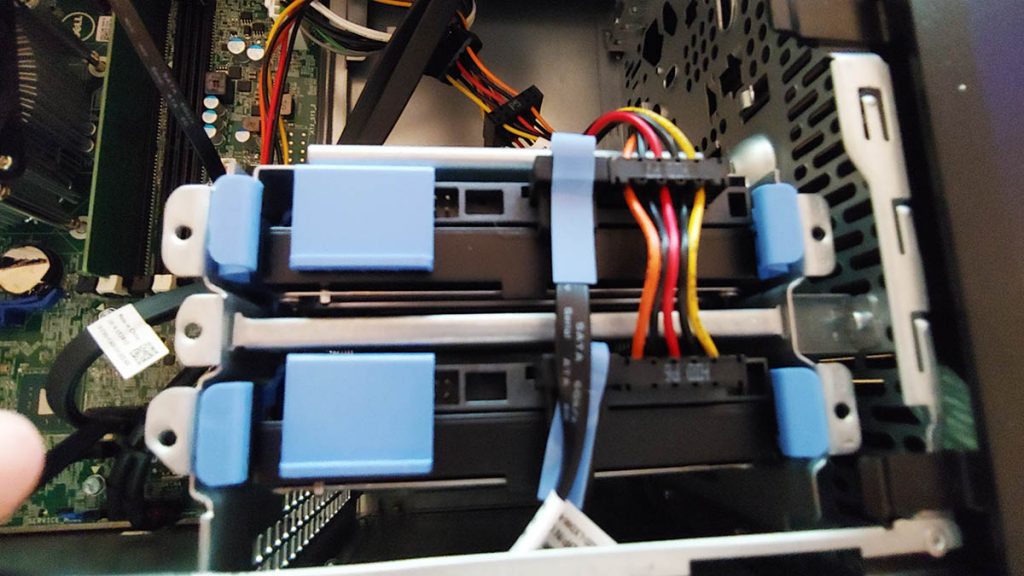
The 3rd drive was added to the top cage. In order to take the top cage out, you have to take off the front panel of the case. I did this by giving it a gentle yank and it came right off. After it is off you just need to slide the entire cage out, the install the drive(s) into the cage. Again, tool-less install.
My one complaint is I do wish Dell would have got rid of, or given me the option to get rid of the DVD drive. There really is no reason to have one of these in a home server these days.
After installation, I ran a power on self test (POST) just to make sure it liked my drives.
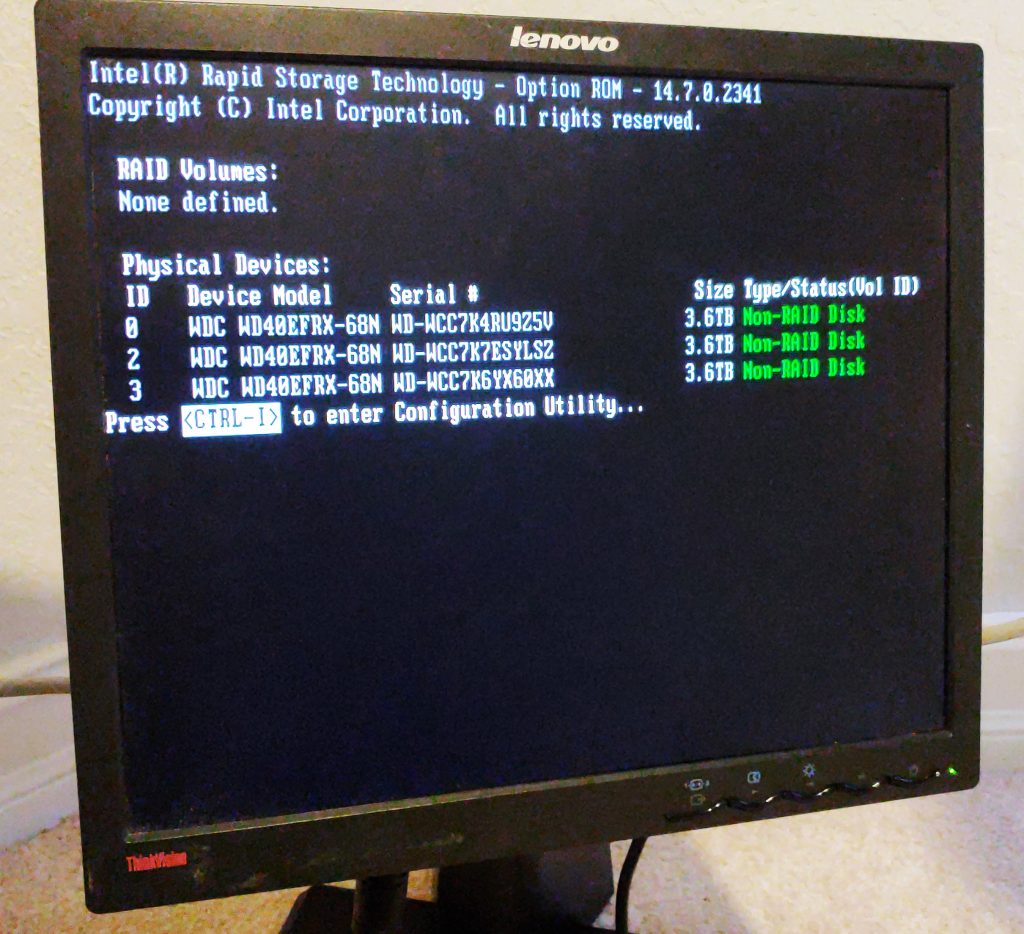
Lovely.
Dell PowerEdge t30 and m.2 PCIe NVME
Before purchasing this, I read a lot about the Dell t30 and m.2 drives. One consistent piece of information that I came across was that this server does in fact have an m.2 slot, and that it would only work with an older BIOS. This comes at a cost: being vulnerable to the “Intel” bug. Since this server is only sitting on my LAN, is not connected to the internet, is behind a firewall, and my data is encrypted I wasn’t too worried about this fact.
Luckily the PowerEdge t30 shipped with an older BIOS, the exact version I needed to run this. Dell’s BIOS has some great enterprise level security features that many will appreciate including TPM and passwords, but aren’t needed in my case. I was able to find version 1.0.0 of the BIOS on Dell’s website for anyone looking for it. Navigate to this page, and click on “older versions” and you will see several versions available for download. If Dell removed it and you need it, hit me up I have it saved on my UNRAID server. :)
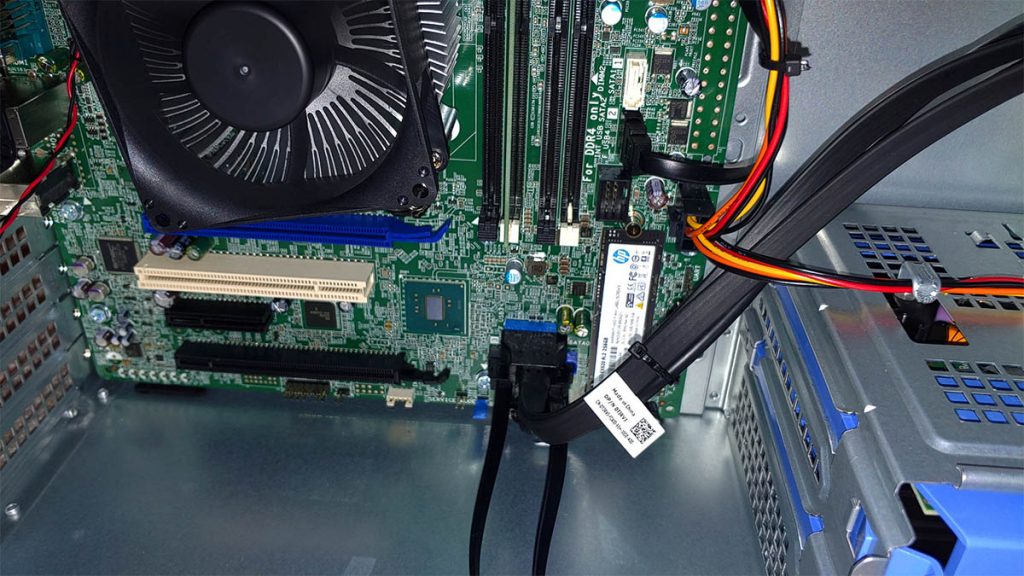
I plugged in the m.2 drive into the slot, added the tiny screw that I always drop 5x times even with a magnetic screwdriver and done. The m.2 nNVME drive sits at the bottom of the case, right in between the SATA ports and the bottom drive cage. It would be under a video card if it was added, but with 290w of power, I don’t see any full-length video card going in this thing.
Potential Future Upgrades
I highly doubt I will ever upgrade this, other than possibly adding another drive. The RAM is ECC DDR4 unbuffered and is not cheap. The current stick that is in this system is Samsung M391A1K43BB2-CTDQ and runs about $80 per stick. About 2x the cost of normal DDR4 desktop RAM. Since I won’t be running any virtual machines, containers or other programs from this machine I really don’t need any more RAM or processing power.
For anyone reading this that is thinking about running docker or VMs from this, I would recommend populating all 4 of the RAM channels with at least 32GB of the Samsung M391A1K43BB2-CTDQ RAM. The CPU really can’t be upgraded unless you want 4C/8T. Again a video card isn’t an option unless you want to replace the power supply. I have heard of people replacing the power supply, but it will require a special adapter since this board uses somewhat of a proprietary connection. One could also add an internal RAID card or SATA expansion card, but again this probably isn’t the machine for you if you are going past 4 drives.
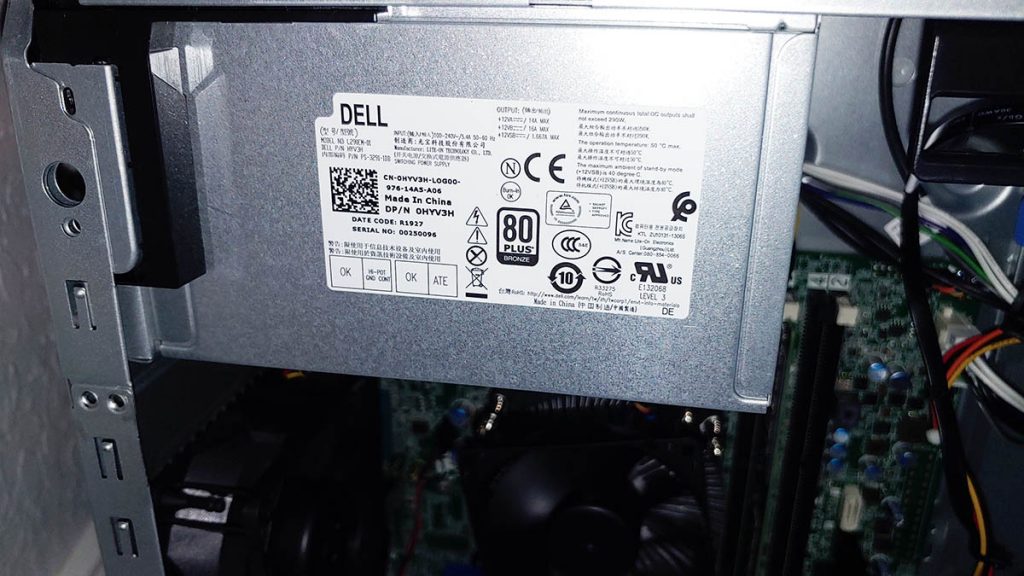
A glimpse of the PSU sticker:
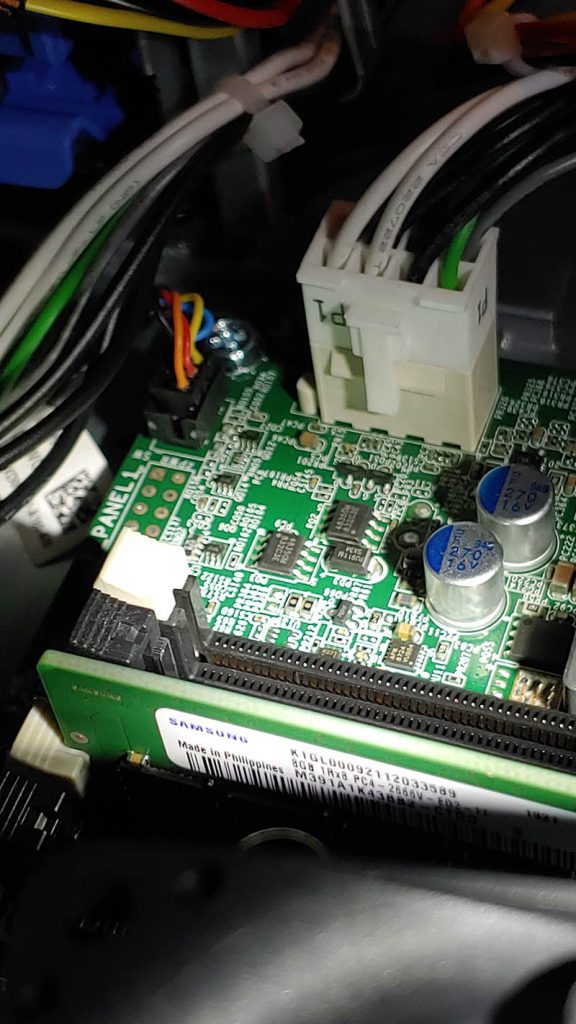
A shot of the main board power, with a peek of the RAM slot.
Installing UNRAID NAS on the Dell PowerEdge t30
Installing UNRAID on the t30 was a breeze. It was my first time using UNRAID. I did a lot of back and forth between UNRAID vs FreeNAS which is kind of like the NAS equivalent of MAC vs PC. Not really a winning argument, just a matter of preference. I did need to purchase a license which is a small investment for how valuable my data is.
The one part that really threw me off was where do I install UNRAID? I thought I would be able to install it on the NVME drive, but UNRAID requires all installs to go onto a USB stick. This was really weird to wrap my head around, but I finally got it. I started out by using a regular length USB stick (about 1-2″ long) which stuck out like a sore thumb. I opted to go with a low-profile USB 2.0 stick (about .5″ long) in the rear port. I was also told USB 2.0 is more reliable in the long run than 3.0. Also speed does not matter, since the entire OS is loaded directly into RAM each time. Fine with me.
All of the drives showed up in UNRAID no problem.
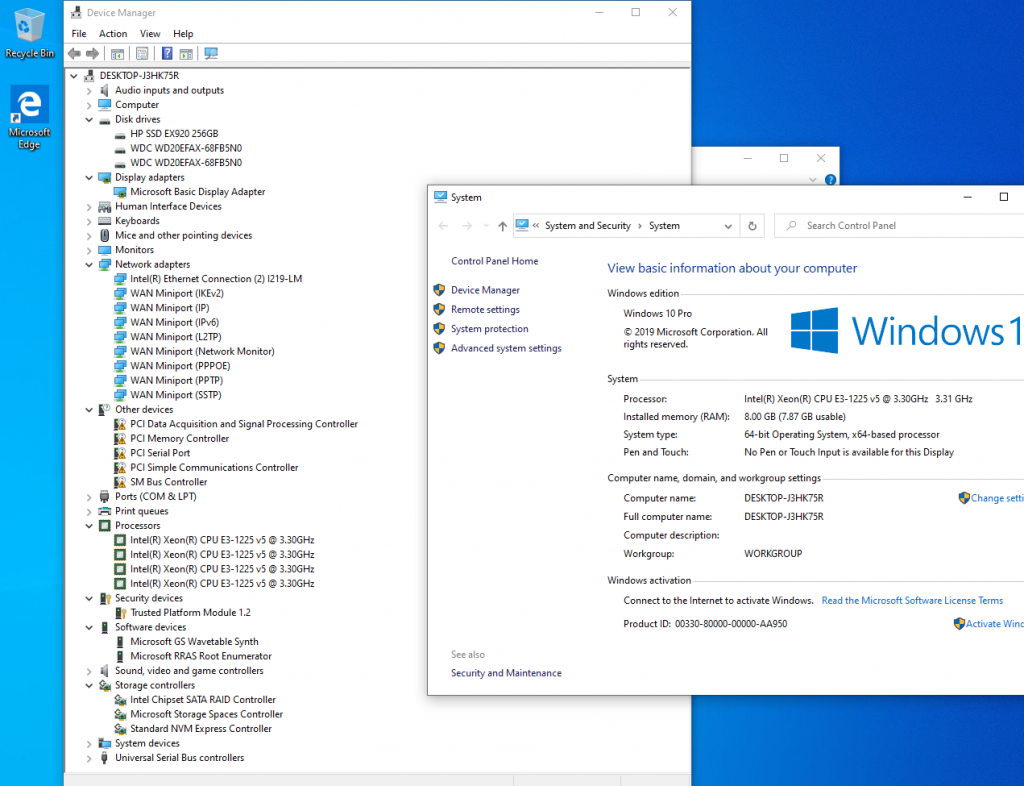
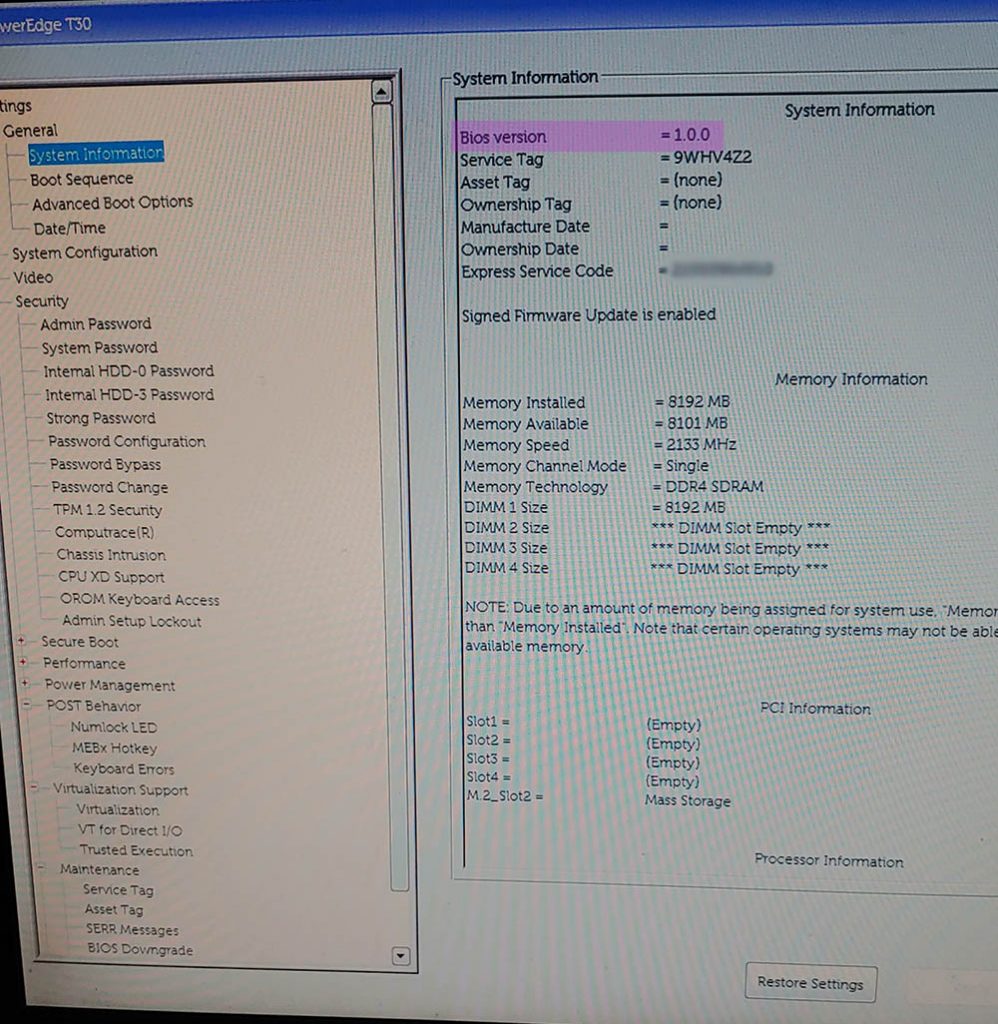
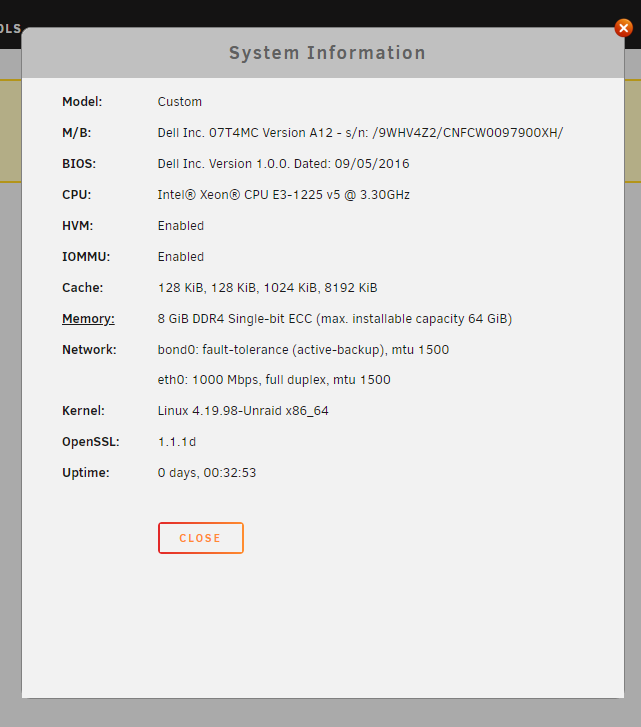
System information all checked out.
Assigned the NVME as the “cache disk” even though I found out that this is mainly used for docker / VM cache, and not as much for file read/write cache. I will still keep this disk around as a scratch disk.
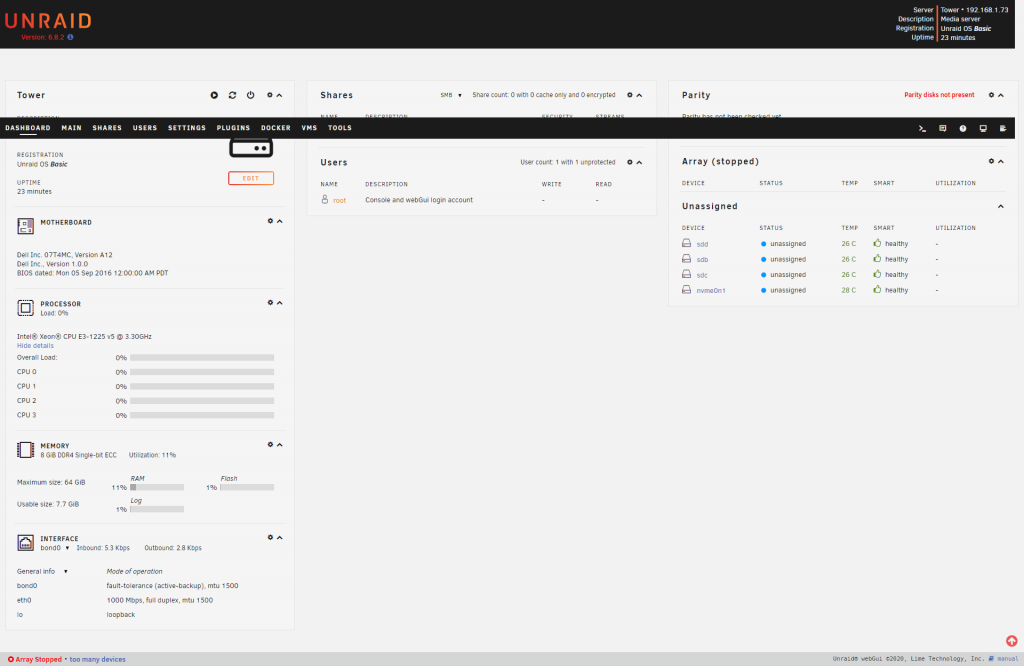
One final piece of configuration I did was to assign a static IP address on my network. Since I have a lot of DHCP devices, this was a small concern. I assigned the UNRAID server an IP in my router configuration control panel, as well as in UNAID. It has been about 10 days and so far, no issue (also no down time.)
I haven’t migrated all of my data to the server yet. I moved about 1 TB of files over and am going to let it sit for a while just to make sure it is running correctly.
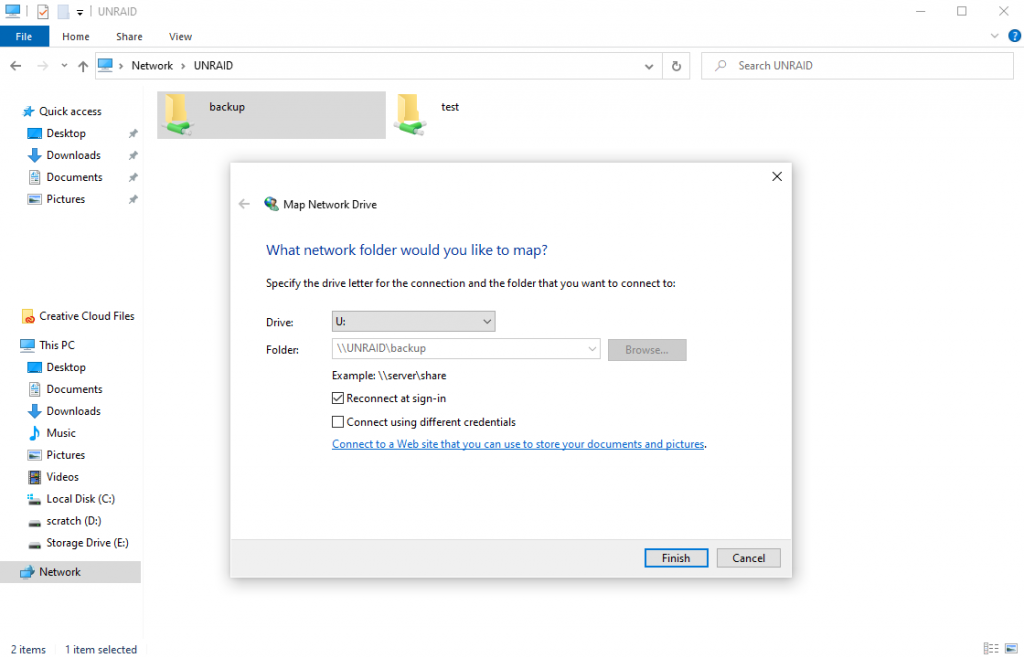
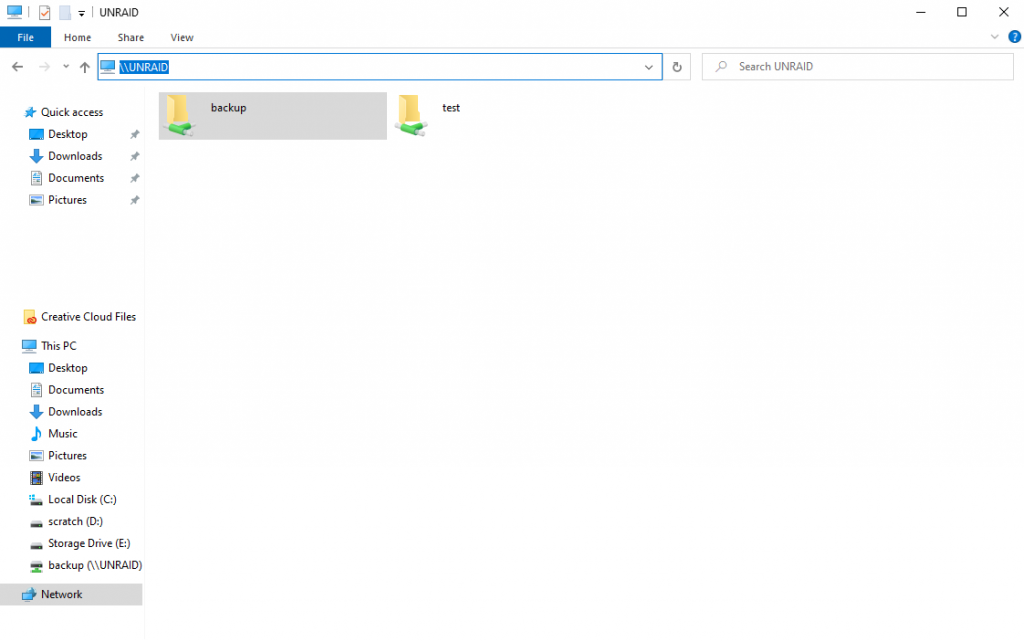
After the install was said and done, I mapped my primary UNRAID share “backup” to my U:\ Drive (“U” for “UNRAID). This is an easy process in Windows and probably familiar for most people.
After mapping the drive, my shares appeared inside as sub-folders. If you want to map individual shares to drives, you can do that also or you could create symbolic links / shortcuts.
Future Plans
In the future I would like to setup a cron job to run rsync to send my most precious data to the cloud, ideally tarballed, compressed and encrypted.
Overall this would be less than 1TB one time, and a few gigs every few months. I would move this to S3 then move it over to Glacier.
Update 2025
Still up and running! It’s been about 5 years and it is running strong. Give it a dusting and regular maintenance and it is does just fine.