AWS Lab: Creating a High Availability WordPress Website

Please note: this is just a lab, not a “production ready” environment. Not secure. I’m using my blog to document my own journey learning WordPress and hopefully to connect with people that I can help, and who can help me get a stronger foundation in AWS. If you’d like to chat, please hit me up on Twitter at @pmkoom.
Hello world! Over the past few months I’ve really been diving deep into the world of AWS and cloud technologies. It all started last year when we inherited a new client that had an impressive cloud setup, and found myself lost on many fronts. Rather than choosing which technologies to learn, I like to kind of let my job dictate which technologies I should learn, based on industry trends.
Today I’m going to do an overview of a recent lab I performed that ultimately yielded a highly available WordPress website.
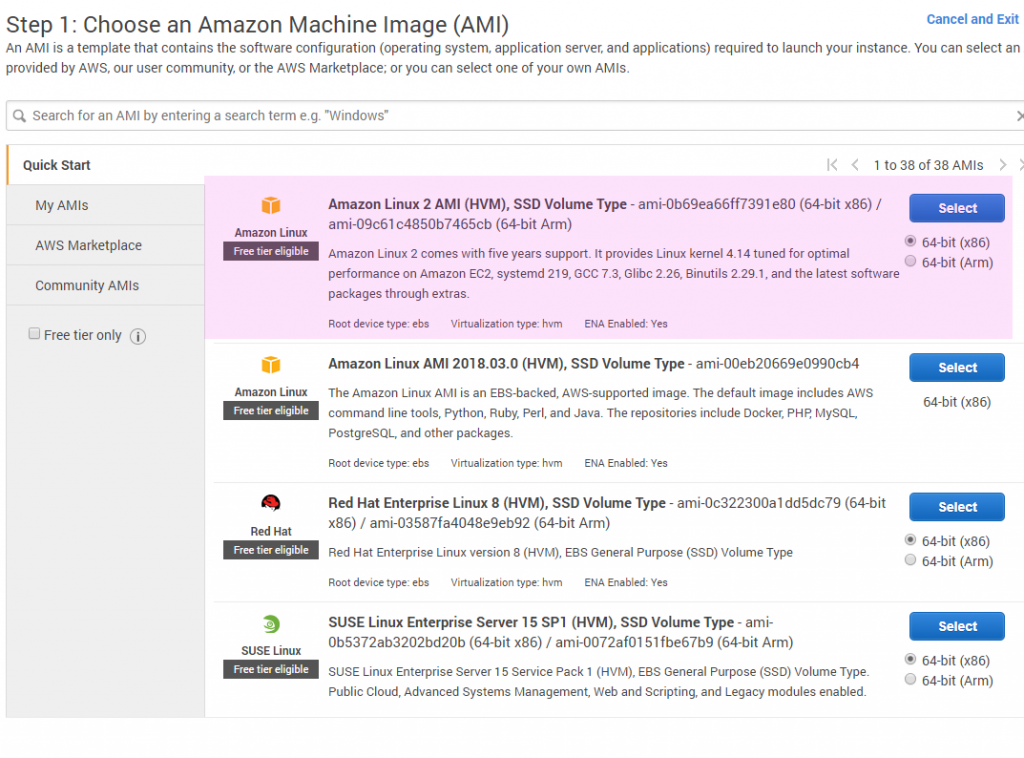
I started out by creating a new ec2 instance, choosing the Amazon Linux 2 64 bit operating system, and using the default settings:
Installing and Configuring EC2
Once it launched, I had a dashboard which gave me some information about the server. At this point, the main thing to note is the IP address of the server. One very important lesson that I’ll go into later on, is that if you reboot or restart your server at any time, you’ll get a new public IP.
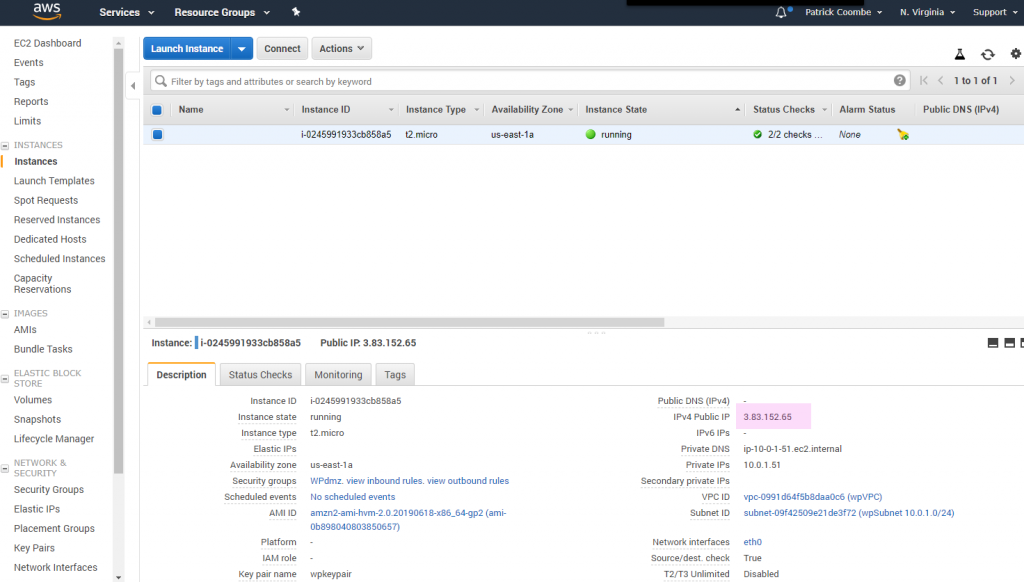
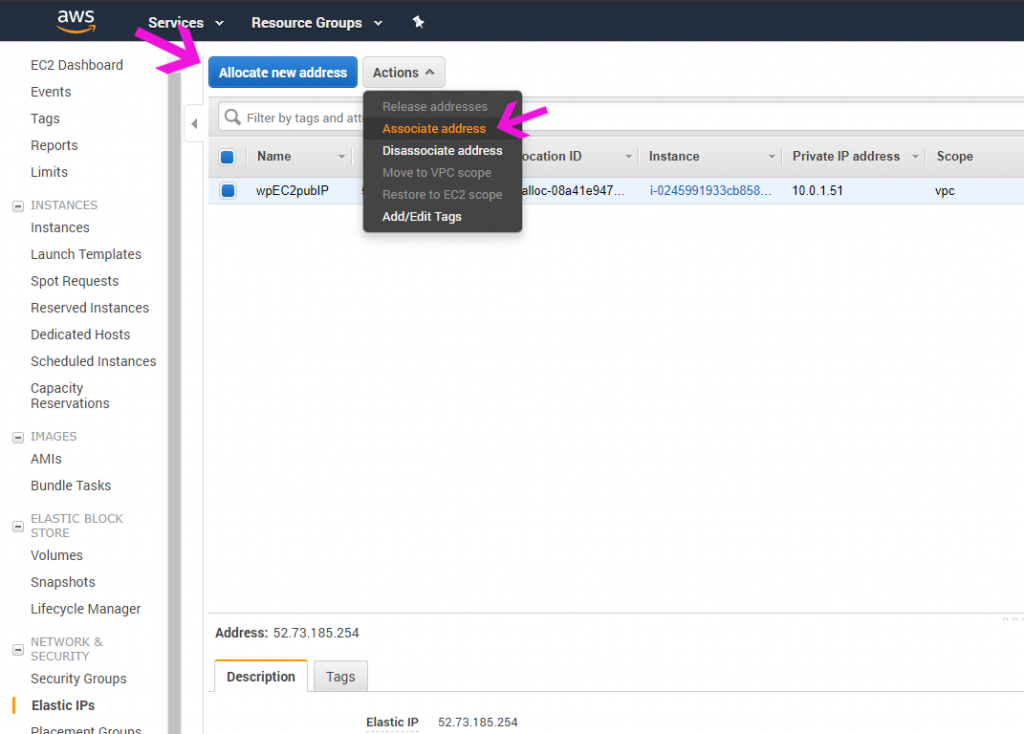
For many circumstances this really isn’t ideal, so I used elastic IP to get a dedicated IP via Amazon. This way anytime the server is stopped or rebooted, I’ll keep the same IP.
Getting a new IP is as easy as going to the ec2 dashboard and clicking on “elastic IP” from the side menu. What I did here was fairly simple. “Allocate new address,” which will reserve a permanent IPv4 address. Once that is done, select the new address and “associate” it with your ec2 server. Done deal.
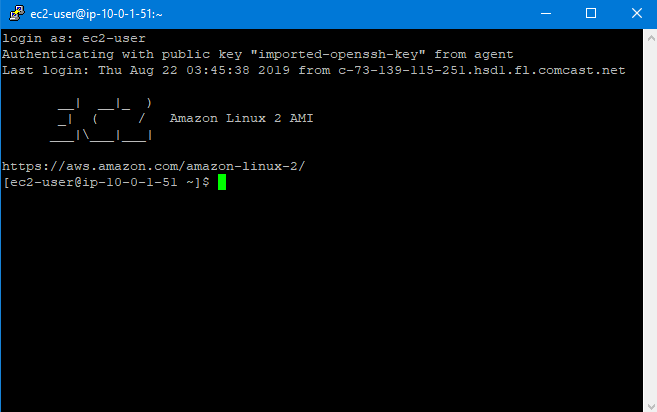
Just to test, using your SSH key and by default “ec2-user” I was able to login using ssh to my server and get root privileges:
Installing a LAMP Server
Now we finally get to hack away at the server. I started by getting a key via Amazon which I saved during the EC2 install process. I used Putty / Windows to connect.
The following commands were executed on this Amazon Linux 2 server to create a “LAMP” server with the following characteristics:
- Amazon Linux 2
- PHP 7.2
- Maria 10.2
- Apache
1 sudo yum update -y
2 sudo amazon-linux-extras install -y lamp-mariadb10.2-php7.2 php7.2
3 sudo yum install -y httpd mariadb-server
4 sudo systemctl start httpd
5 sudo systemctl enable httpd
6 sudo systemctl is-enabled httpd
7 sudo usermod -a -G apache ec2-user
8 sudo chown -R ec2-user:apache /var/www
9 sudo chmod 2775 /var/www && find /var/www -type d -exec sudo chmod 2775 {} \;
10 find /var/www -type f -exec sudo chmod 0664 {} \;
11 top
12 echo "<?php phpinfo(); ?>" > /var/www/html/phpinfo.php
13 sudo systemctl start mariadb
14 sudo mysql_secure_installation
15 sudo systemctl enable mariadb
16 sudo yum install php-mbstring -y
17 sudo systemctl restart httpd
18 sudo systemctl restart php-fpm
19 cd /var/www/html
Installing phpMyAdmin
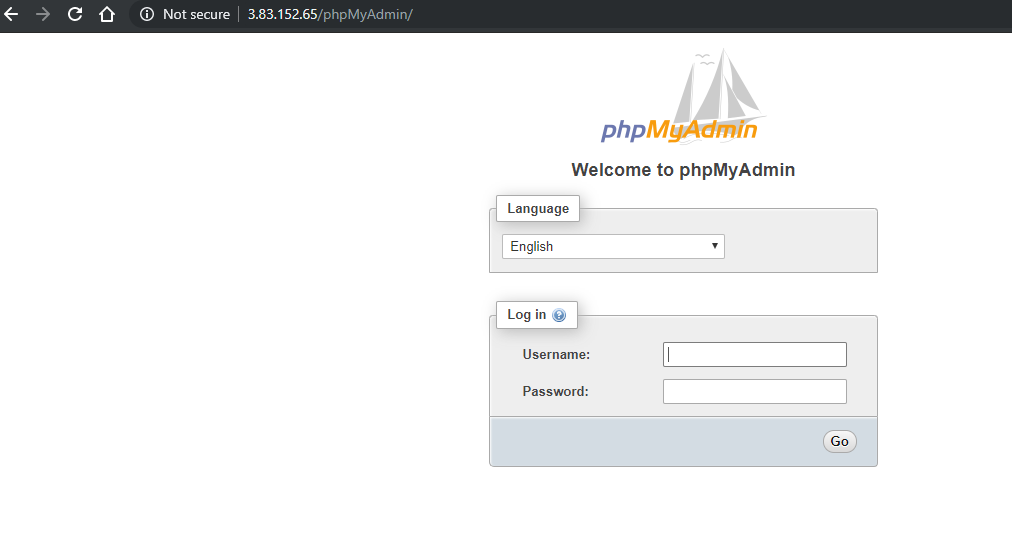
While I can get by using MYSQL on the command line, I’d much prefer to use phpMyAdmin to manage databases. Installing phpMyAdmin is a breeze:
20 wget https://www.phpmyadmin.net/downloads/phpMyAdmin-latest-all-languages.tar.gz
21 mkdir phpMyAdmin && tar -xvzf phpMyAdmin-latest-all-languages.tar.gz -C phpMyAdmin --strip-components 1
22 rm phpMyAdmin-latest-all-languages.tar.gz
23 sudo systemctl start mariadb
Basically what this does is get the latest version of phpMyAdmin, make a dir for it, unpack it and run it. Then clean it up, and start the mariadb process.
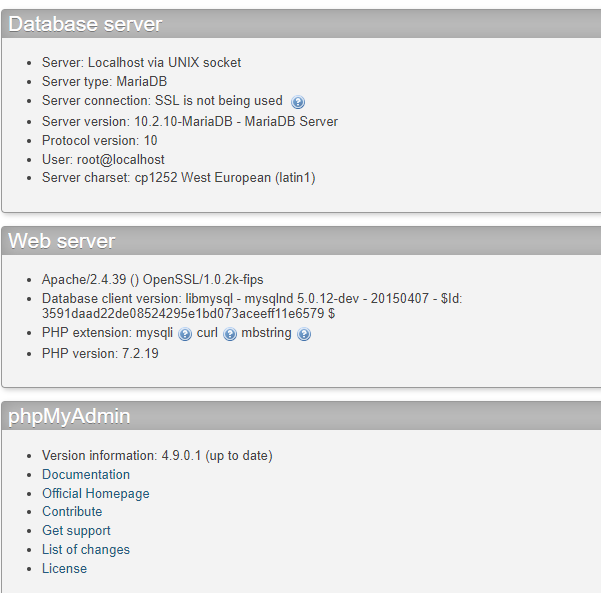
Once that is done you can go to phpMyAdmin in the browser:
Once logged in I could also see some info about the server and the MariaDb version.
Installing WordPress
Installing WordPress was super easy, just like normal:
25 wget https://wordpress.org/latest.tar.gz
26 tar -xzf latest.tar.gz
27 sudo systemctl start mariadb
28 mysql -u root -p
29 mysql -u root -p
30 cd wordpress
31 ls
32 cp wp-config-sample.php wp-config.php
33 vi wp-config.php
34 ls
35 cd ..
36 ls
37 cp -r wordpress/* /var/www/html/
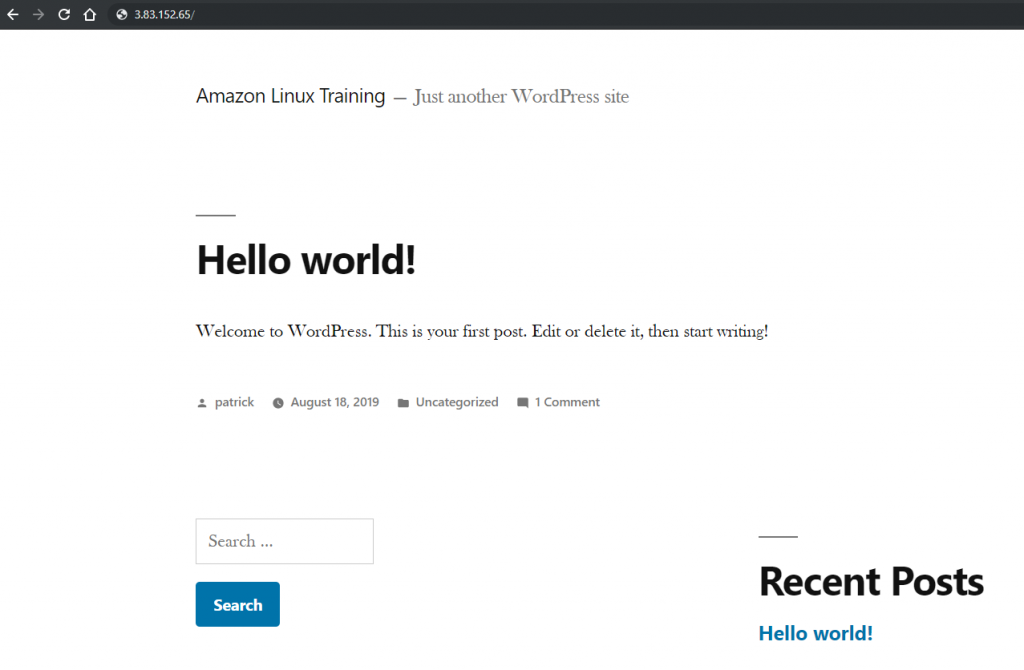
After some basic tweaks, I could see WordPress:
LAMP Server and WordPress Configuration
At this point LAMP and WordPress is on the server but not running or configured. We also needed to set it up so it starts with the server. I also cleaned up the WordPress package and did some tweaks to wp-config.php and httpd.conf
38 sudo vim /etc/httpd/conf/httpd.conf
39 sudo chown -R apache /var/www
40 sudo chgrp -R apache /var/www
41 sudo chmod 2775 /var/www
42 find /var/www -type d -exec sudo chmod 2775 {} \;
43 find /var/www -type f -exec sudo chmod 0664 {} \;
44 sudo systemctl restart httpd
45 sudo systemctl enable httpd && sudo systemctl enable mariadb
46 sudo systemctl status mariadb
47 sudo systemctl status httpd
48 ls
49 ls -lah
50 rm -rf wordpress
51 ls -lah
52 rm latest*
53 clear
54 ls
55 cat wp-config.php | more
56 vi wp-config.php
57 ping localhost
58 ifconfig
59 /sbin/ifconfig
60 ls
61 cat wp-config.php
Route53: Domain Names and DNS
The next part is pretty simple and was familiar to me, registering a domain name. I used Amazon’s Route53 to register a new domain name, which was quick and simple.
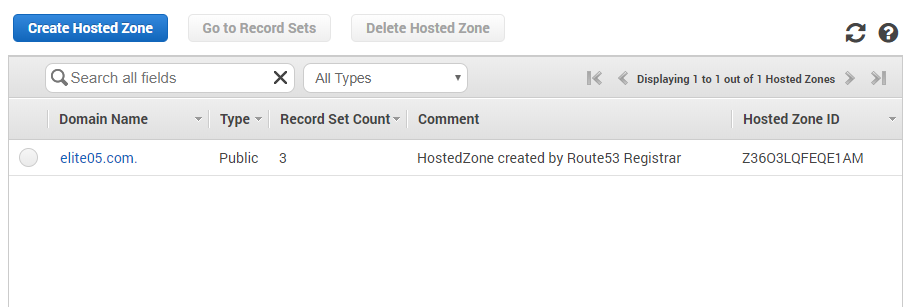
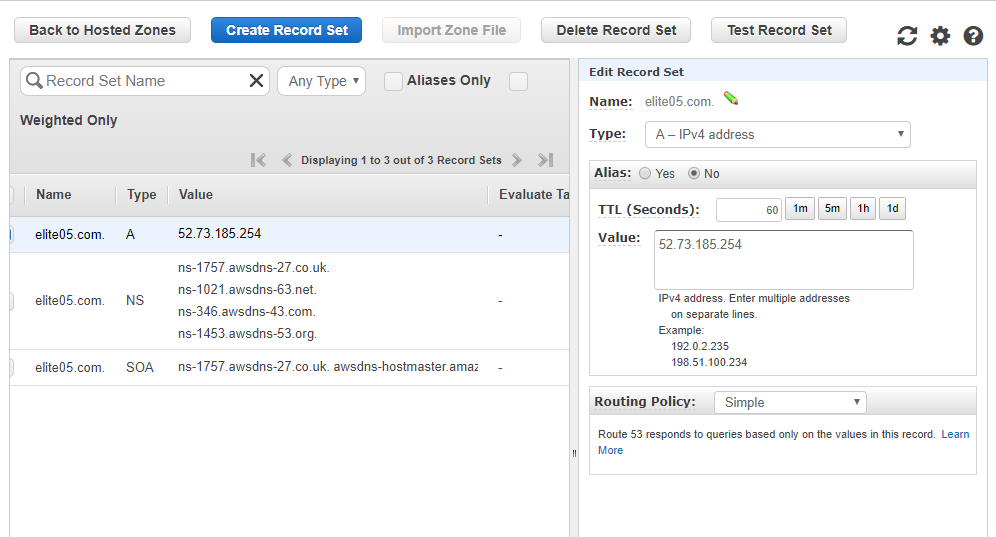
Once it was registered, I went ahead and created some zones. Mainly the A record needed to point to the EC2 server I created. During my training I learned about different routing policies. Conceptually the one part I don’t understand is how you can have 1 website, with multiple servers without a load balancer. Do you need a load balancer in order to take advantage of routing policies such as weighted etc?
Installing SSL / HTTPS with Certbot
I ran into some difficulty installing SSL using traditional methods, but I ran across a tool which is apparently very well known and liked called certbot. It basically does everything for you using an interactive command line tool.
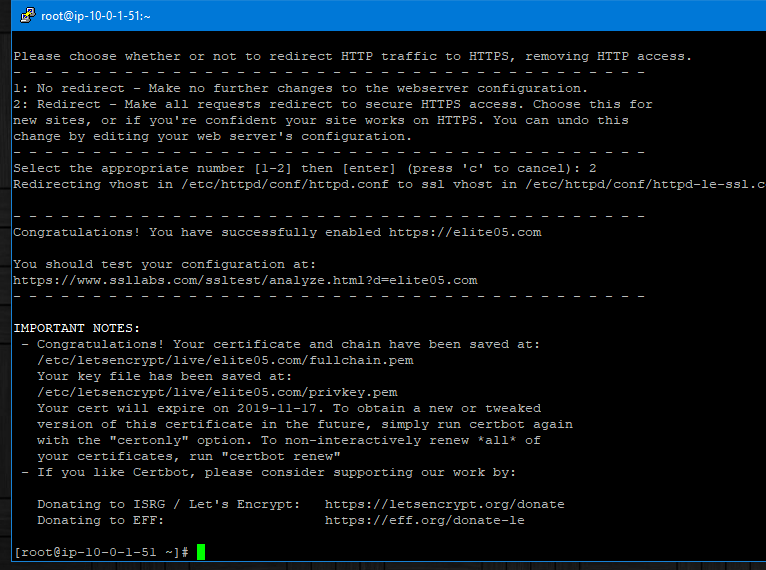
I used the following commands to install and configure certbot:
91 sudo wget -r --no-parent -A 'epel-release-*.rpm' http://dl.fedoraproject.org/pub/epel/7/x86_64/Packages/e/
92 sudo rpm -Uvh dl.fedoraproject.org/pub/epel/7/x86_64/Packages/e/epel-release-*.rpm
93 sudo yum-config-manager --enable epel*
94 vi /etc/httpd/conf/httpd.conf
95 sudo systemctl restart httpd
96 sudo yum install -y certbot python2-certbot-apache
97 sudo certbot
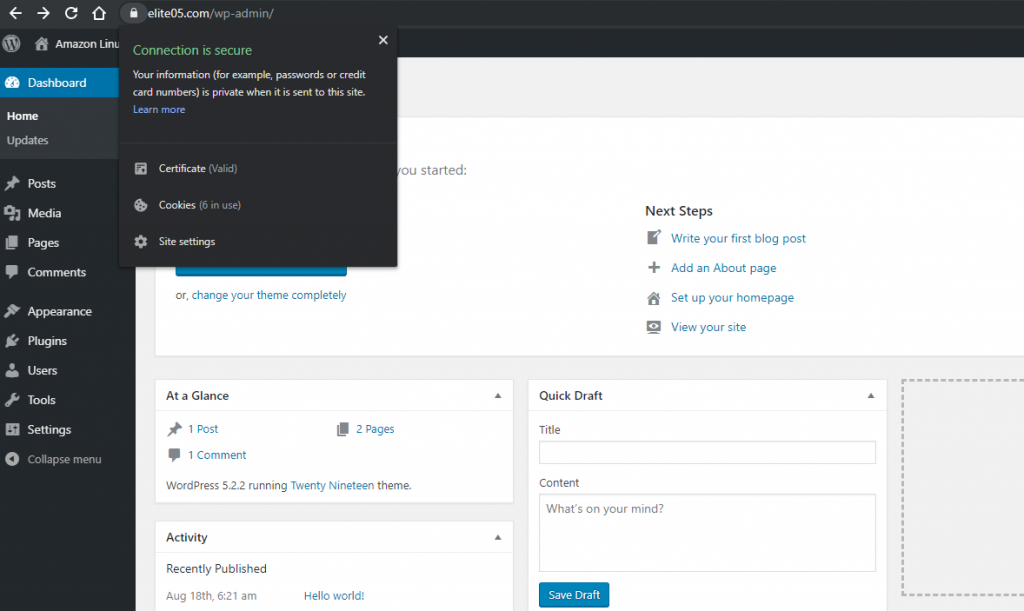
Now that I have SSL and a domain name I can configure WordPress to enable SSL. Changed the WP adress and site address to https and saved.
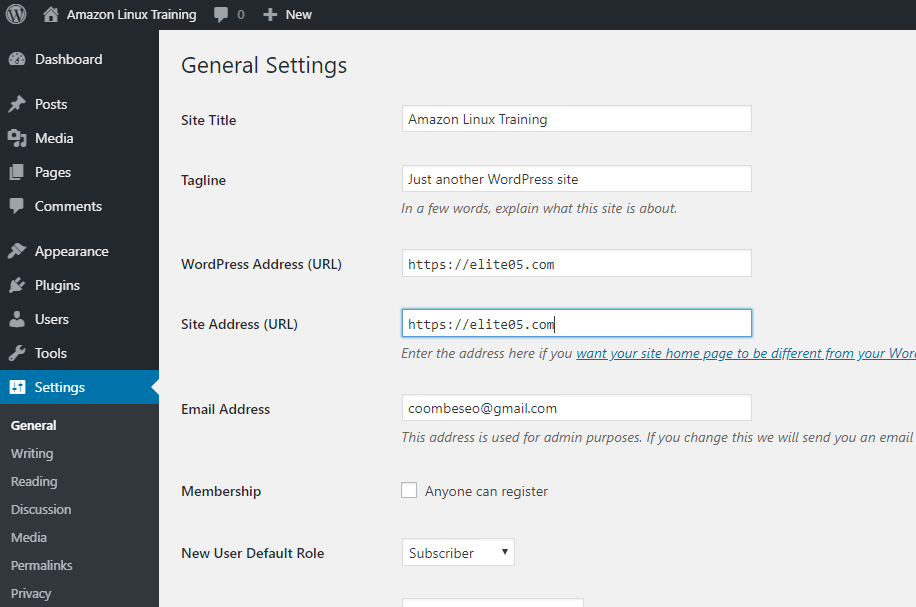
Once that is done no need to make any other changes to anything, no mixed content warnings or anything.
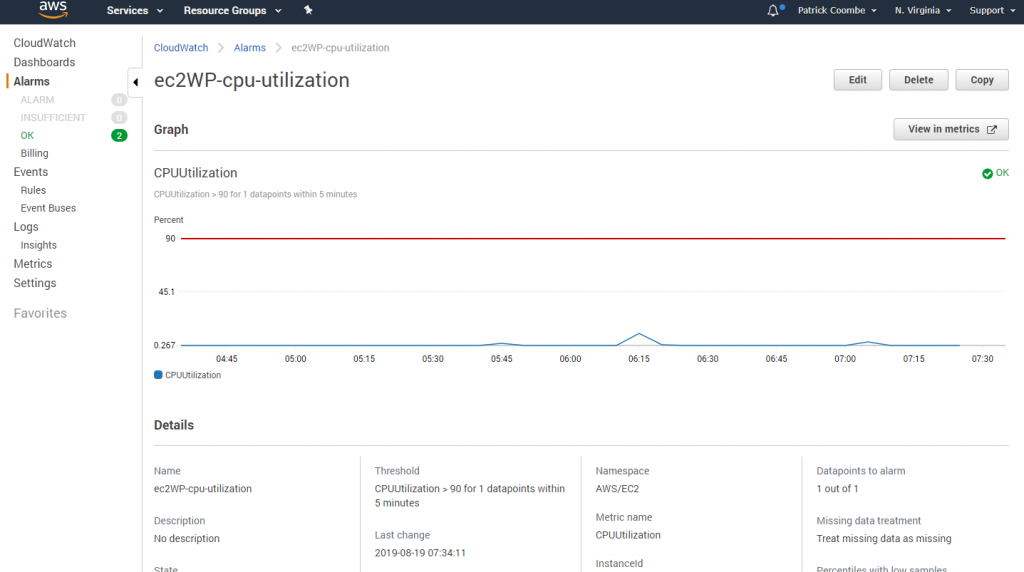
Cloudwatch
The next part is pretty crucial, not only for server monitoring but for billing also. I’ve been in a position with AWS in the past where I racked up a $500 bill in 1 night because I was testing a new service and forgot to turn it off!
So I created a billing alert to alert me if my charges went over $100. I don’t have any other services running on this account so it really shouldn’t go beyond $10-20 a month for this test website.
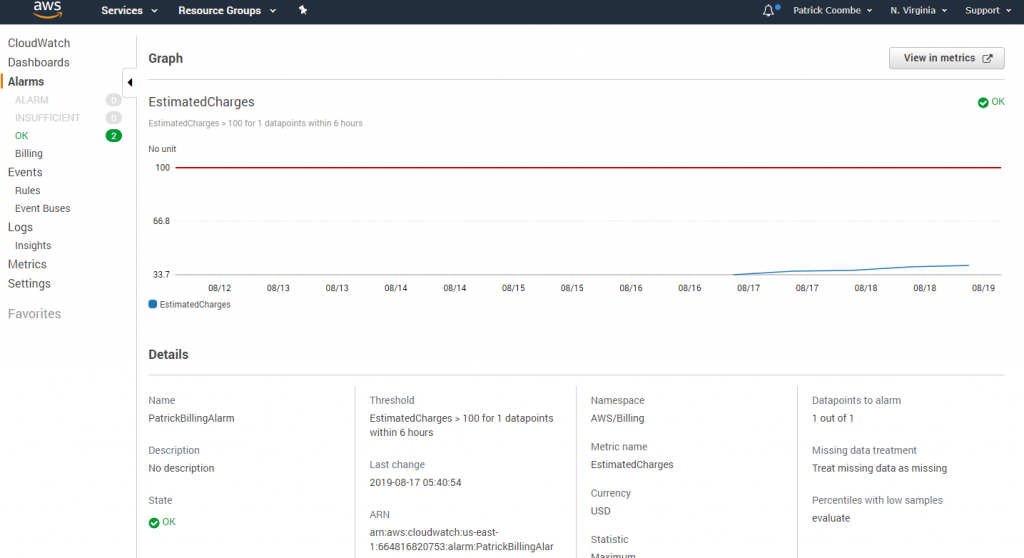
Then I made an alarm for CPU utilization. If it stays above 90% utilization, I get an alert.
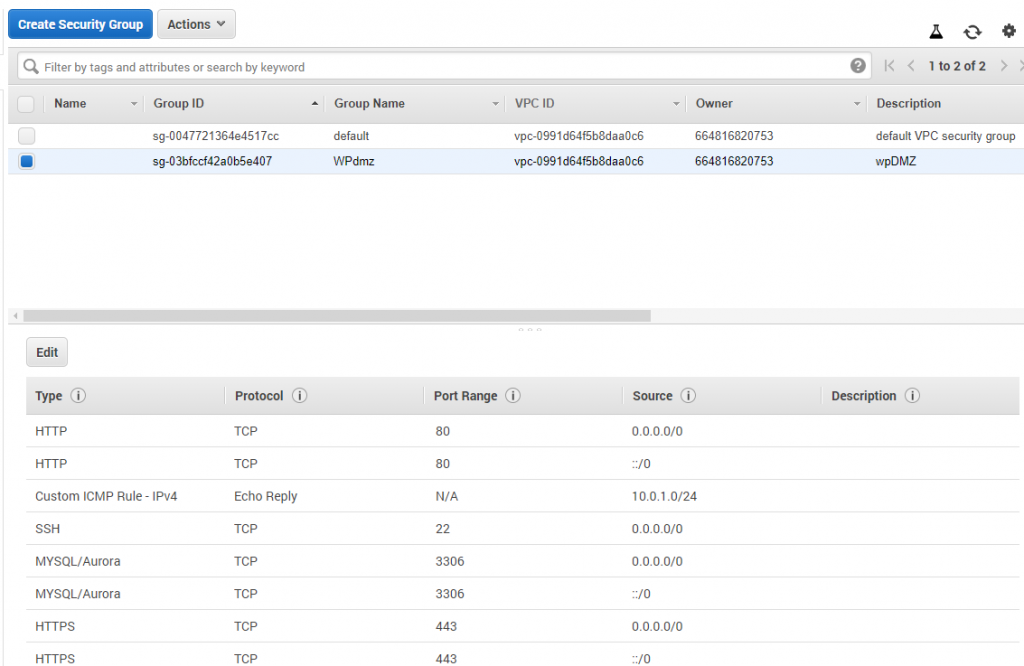
Basic Security and VPC
Out of all of the cloud concepts, cloud VPC’s are the hardest for me to grasp. Maybe because I’ve never worked in a data center or had a “real” admin job other than working for myself.
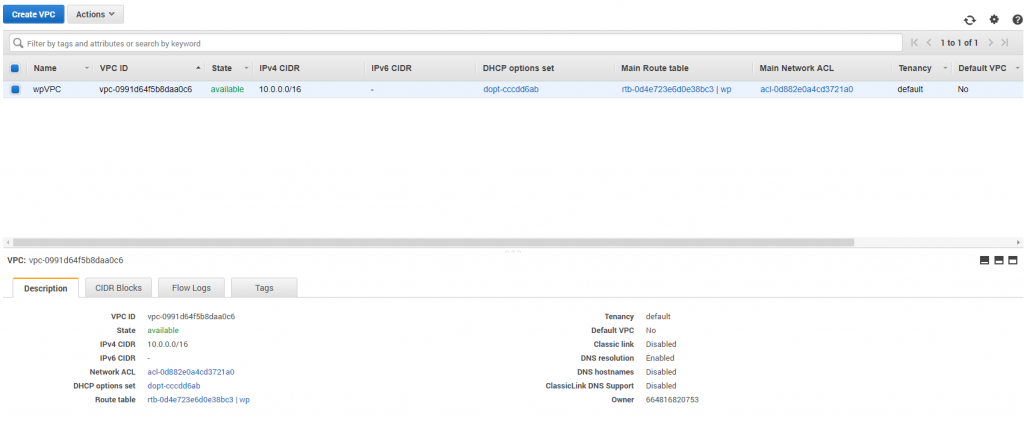
Security concepts are a little easier for me to understand. Blocking access to ports is easy with AWS. AWS makes it really easy to allow/deny and later when I work with RDS getting it so RDS can only “see” the EC2 server and not the outside world is a great example of layering.
Definitely not claiming that this server is “hardened” by any means, just learning how to implement basic skills in AWS.
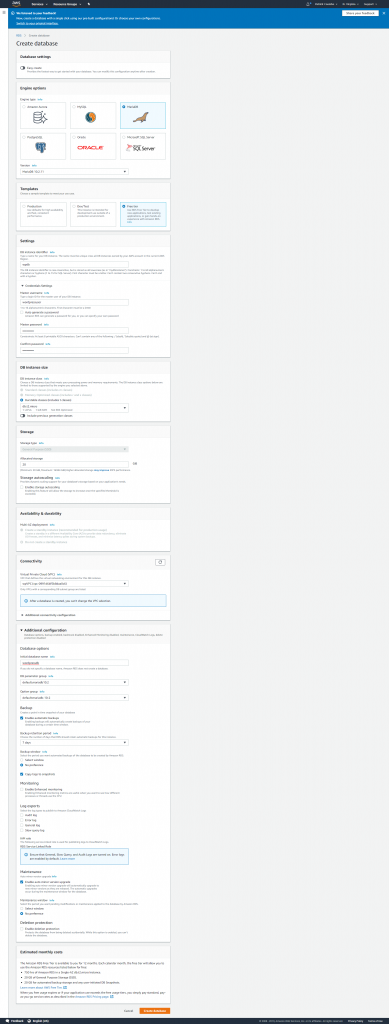
Installing and Configuring Amazon RDS with WordPress
I’ve been learning and reading a lot about Amazon RDS lately, and following a lot of bloggers that have utilized Amazon RDS with WordPress. Amazon RDS is a great “addon” to a WordPress setup for many reasons:
- it is extremely fast
- it is made just for databases
- very low maintenance
- fairly foolproof security
- one less thing to worry about on your LAMP server
- can load network objects concurrently
If you are new to RDS and cloud, just think of it as a standalone database server for now.
The first thing you need to do if you want to create a marriage between WordPress and RDS is create an RDS database. There are tons of configuration options, for the purpose of this lab the 3 important options that I chose were:
- Maria DB (since that is what my LAMP server used)
- version 10.2
- Free tier
After that you pretty much just need to name it, give it some credentials (make sure they match the credentials from wp-config.php) and create it.
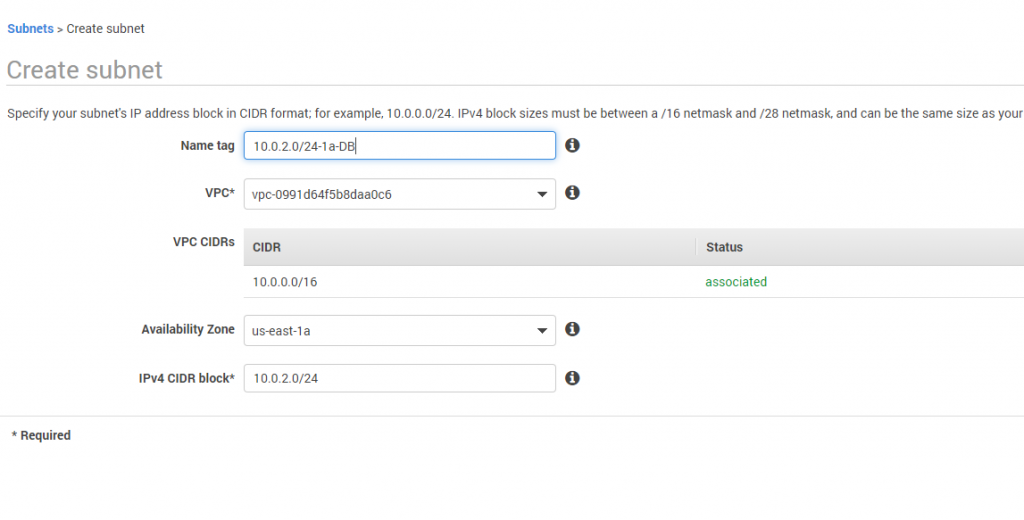
Created a subnet for the database server:
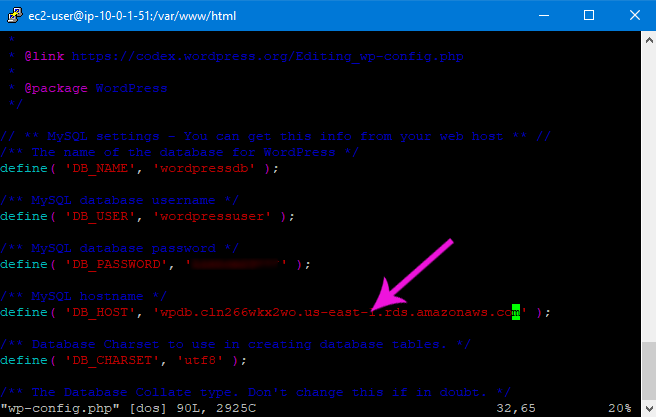
Ok now for the key part, switching out the database server in wp-config.php. You get this from your RDS dasboard. Here goes nothing:
Now for some more “high availability” typa stuff. Will create a “read replica” for the WordPress database. Essentially what this does is makes a copy of the database so when multiple concurrent users are pulling from the database, it will have 2 databases to pull from instead of one. Definitely faster, more redundant, and makes the site “more available.”
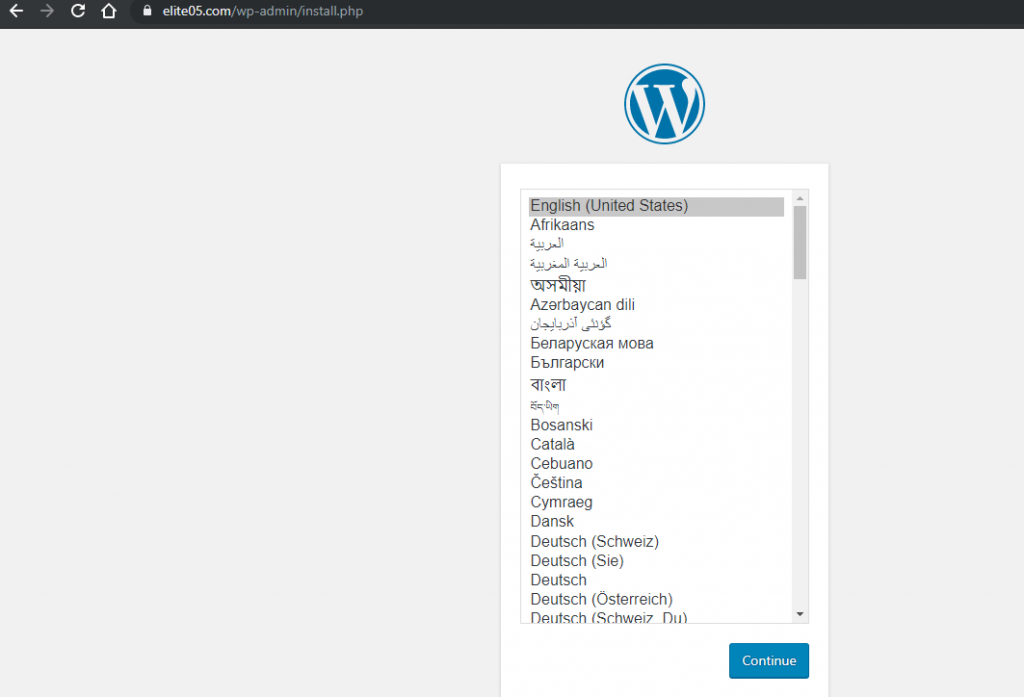
Since this is a new WordPress website, when I log back into WordPress I got this screen:
Not sure what I would have done if it would have been an existing WordPress site / database. Would have needed to figure out how to import the database into RDS.
Can anyone comment or help me with this?
To do:
I’d love to figure out how to serve the WP core files from S3, not sure how to go about this yet. I’m still reading up on how to do this, seems like there are a few different ways to do this most of them involve a plugin that copies the files.
I would also like to learn more about Amazon Cloudfront. I’ve integrated MaxCDN and Cloudflare in the past with WordPress and other frameworks, but never Cloudfront.
A sturdier route53 table, some sort of failover. Again I need to grasp this more conceptually. How does this work exactly for a single website.
Lastly I would like to learn more about Amazon load balancers. I feel that by adding a load balancer it will really gain the “high availability” status.
Would really appreciate any comments or suggestions, or if you are super new to AWS like me some questions I’d be happy to answer. Easiest way to get in touch with me is via Twitter I am @pmkoom.
Thanks all!