WordPress Security Scanning for Total Newbs

Network security has always been a hobby of mine. I’ve always been interested in vulnerability scanning, pen testing, hacking and the likes. Last year when our website got hacked I actually got a little excited because I got to figure out how it was done and how to fix it (it was a WordPress SQL injection as a result of an outdated plugin).
Anyway, by no means to I consider myself an expert or even an amateur, but I have picked up a few great methods along the way. One method that I’ve picked up is scanning WordPress for known security issues. Today, if you are interested I will walk you through how to setup a Linux node to do your scanning, how to install the programs needed to scan WordPress, and how to get the most out of your scan.
Disclaimer: In this post I’ll only be scanning my own server / domain. It is considered by some unethical and possibly illegal to scan domains that are not your own, so be aware. Also note that by no means is this to be considered a comprehensive analysis and should not take the place of a network admins job.
Getting set up
I’m going to walk you through the way I do things. Keep in mind there are dozens of ways to get this setup. You can make a VM on your computer, a remote VPS, a desktop version of *nix, whatever. For this purpose I am going to recommend signing up to Digital Ocean. You can get a fully functioning Linux server for $5. Signup here (no affiliate link.)
I’m not going to walk through the process of signing up for Digital Ocean, it should be fairly straightforward. If you can’t figure this out, this tutorial probably is not for you. Choose the recommended settings, choose Ubuntu (latest version) and defaults.
Once your setup, get your IP address, username and password together. Download PuTTY.
Connect to your newly created VPS using your IP and credentials and just sit there for a second.
Installing WPScan
Once at the command line, you are going to install a program called WPScan. WPScan is an open source program written in ruby that has been around quite a while, and trusted by many folks in the WordPress and security community.
Follow these directions to install WPScan. I would double check with WPScan’s website for updated dependencies and install directions / locations if things don’t work out.
sudo apt-get install git
Then you will want to make sure we have everything we need to install WPScan
sudo apt-get install libcurl4-gnutls-dev libopenssl-ruby libxml2 libxml2-dev ruby1.9.3
After that, clone the repository:
git clone https://github.com/wpscanteam/wpscan.git
Now move to the directory where the WPScan repository is
cd wpscan
sudo gem install bundler && bundle install --without test development
We’re live baby, yea!
Performing a WordPress Security Audit
Alrighty, we’re live. In addition to the disclaimer listed above, I’ve recently heard of a few people that corrupted their WP databases from running WPScan on the same machine as the target machine. I don’t know if there is any validity to this, but be warned. Please remember, only scan domains that you own or are authorized to scan.
Start by cd’ing into the WPScan (wpscan) directory if you aren’t already.
Once you are there, the magic command to get started is:
./wpscan.rb http://www.example.com
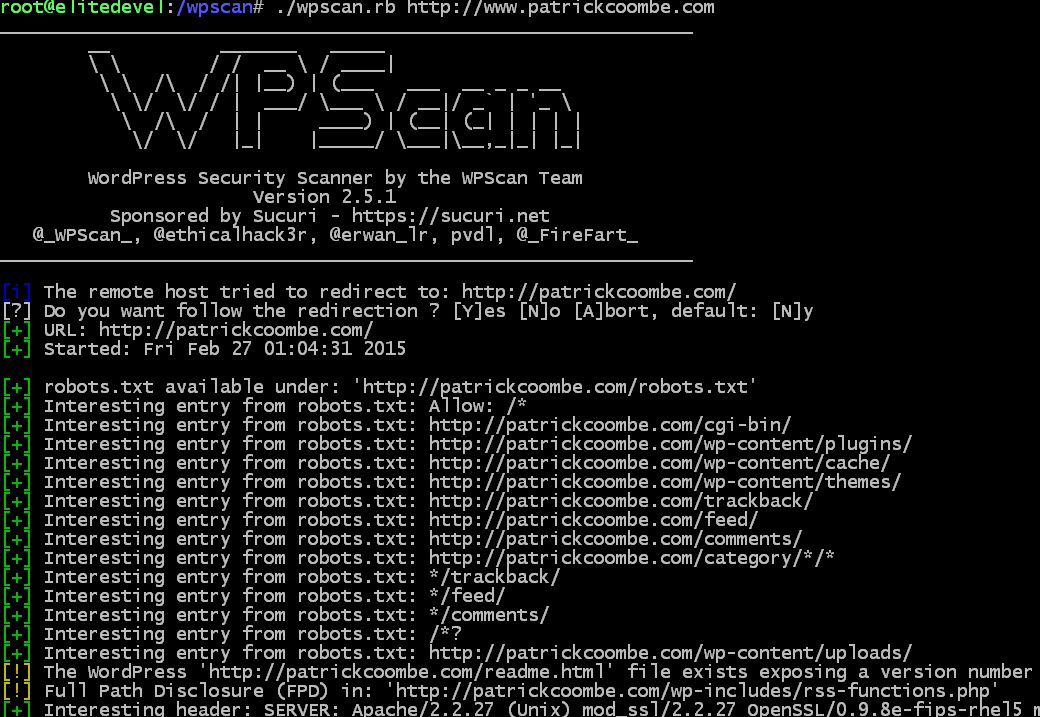
For the purpose of this blog, I’ll be posting the results of my scan on this domain, piece by piece. Here is the first part:
The first few lines just spits out some information about the program, the contributors and version number.
From there it jumps right into the robots.txt file. Nothing so interesting in here, right? Probably not, but a lot of folks tend to put important URLs in the robots.txt file.
For instance, an SEO might not want Google to crawl /administrator but for a hacker that is the first piece to the puzzle. Sometimes just finding out the path to the login prompt is half the battle.
So in short, some of this might be useful, some of it might not.
WPScan also tells us here that our version number is visible via the readme.html file. Again, not super useful if your WordPress version is up to date, but this could be a huge gift to a hacker if your version of WordPress is out of date. An easy fix for this would be to delete your readme.html file. WPScan also tells us what server we are running and some more info. This can be a big problem if your server is out of date and can be another way into your website.
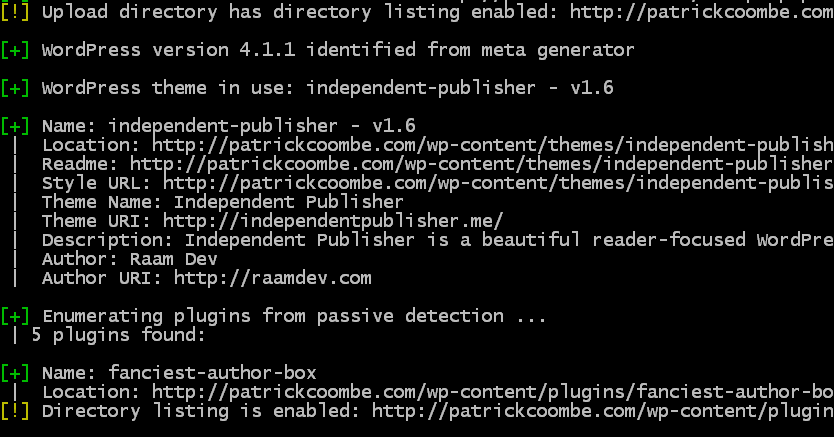
The next warning “Upload directory has directory listing enabled…” is actually a big problem, with an easy fix. You never want to allow folks to browse your directory listings. They can essentially see what files / folders you have and if your game is not on point hackers can easily exploit many different file types.
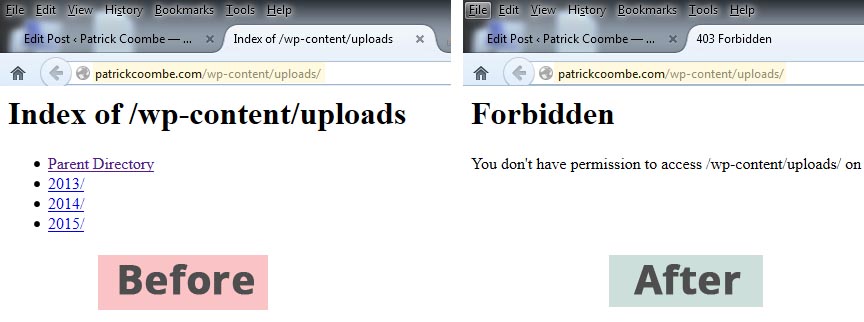
To fix this issue, I simply edited my .htaccess file and added this line:
Options -Indexes
You can see the before / after the effect of this line added to the .htaccess file here.
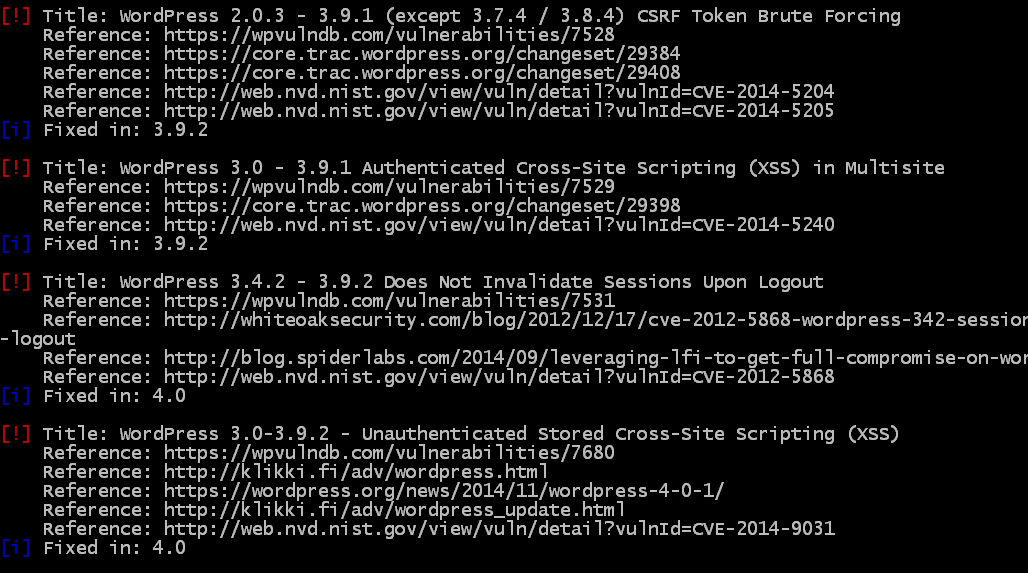
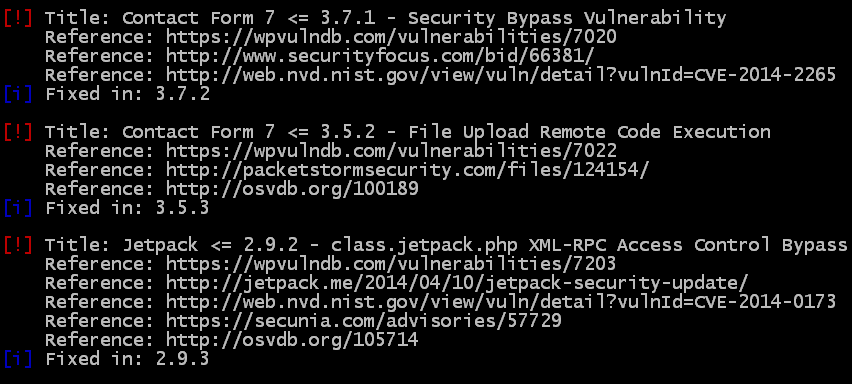
After this, the scan goes into theme and plugin detection and will let you know if your plugins / themes are out of date and if so what kind of attack(s) they are vulnerable to. Some are worse than others. Since I don’t have any outdated plugins on this server, I’ll show you a lesser-maintained site and the WPScan results of that.
So not only does WPScan list the vulnerability, it will actually link you to the reference of the hack, and in some cases will walk you through a proof of concept. As you can see this website is only out of date for about 6 months, but that is enough to generate some very scary hacks capable of taking down your site, and possibly server.
Now lets take a look at what a website with outdated plugins looks like:
When you see the words “Access Control Bypass” that is pretty scary.
I hope by now you all get the idea.
Again, this tool is not meant to be a comprehensive solution, but rather a quick check under the hood.
If you need help getting setup, or would like a free audit, please feel free to hit me up on the Twitters.
